Discover how to make a car seat cover at home using simple materials and beginner-friendly techniques. This DIY project saves money, adds personal flair, and protects your car’s interior from wear and tear—perfect for any car owner.
Key Takeaways
- Save money: Homemade car seat covers cost a fraction of store-bought ones, especially when using recycled or budget-friendly fabrics.
- Customize your style: Choose colors, patterns, and textures that match your personality or car interior for a unique look.
- No sewing required (optional): Use no-sew methods like fabric glue, iron-on hem tape, or stretchable fabrics for quick assembly.
- Protect your seats: DIY covers shield against spills, pet hair, UV damage, and everyday wear, extending your seat’s lifespan.
- Eco-friendly option: Repurpose old clothes, curtains, or upholstery fabric to reduce waste and give new life to materials.
- Perfect fit guaranteed: Measure your seat precisely to create a snug, professional-looking cover that stays in place.
- Beginner-friendly process: With basic tools and clear steps, even first-time DIYers can complete this project in under a few hours.
How to Make Car Seat Cover at Home – Easy DIY Guide
Want to protect your car seats without spending a fortune? Making a car seat cover at home is a fun, affordable, and rewarding DIY project. Whether you’re dealing with stains, pet hair, or just want to refresh your car’s interior, a custom seat cover can do the trick. The best part? You don’t need to be a sewing expert or own expensive tools. With a few simple materials and some creativity, you can craft a stylish, functional cover that fits your seat perfectly.
In this step-by-step guide, we’ll walk you through everything you need to know—from measuring your seat to choosing the right fabric and assembling your cover. We’ll cover both sew and no-sew methods, so you can pick the approach that works best for your skills and time. By the end, you’ll have a durable, personalized car seat cover that looks great and protects your investment.
What You’ll Need
Before you start, gather these essential supplies. Most items can be found at craft stores, fabric shops, or even around your home.
Visual guide about How to Make Car Seat Cover at Home Easy DIY Guide
Image source: i.pinimg.com
- Fabric: Choose durable, washable material like canvas, denim, microfiber, or outdoor upholstery fabric. For a no-sew option, consider stretchable jersey knit or fleece.
- Measuring tape: To get accurate seat dimensions.
- Scissors or fabric cutter: For clean cuts.
- Pins or fabric clips: To hold fabric in place while working.
- Sewing machine (optional): If you’re sewing your cover.
- Thread: Match it to your fabric color.
- Fabric glue or iron-on hem tape (for no-sew method): Great for beginners.
- Chalk or fabric marker: To mark cutting lines.
- Old bedsheet or muslin (for pattern): To create a template.
- Safety pins or elastic bands (optional): To secure the cover in place.
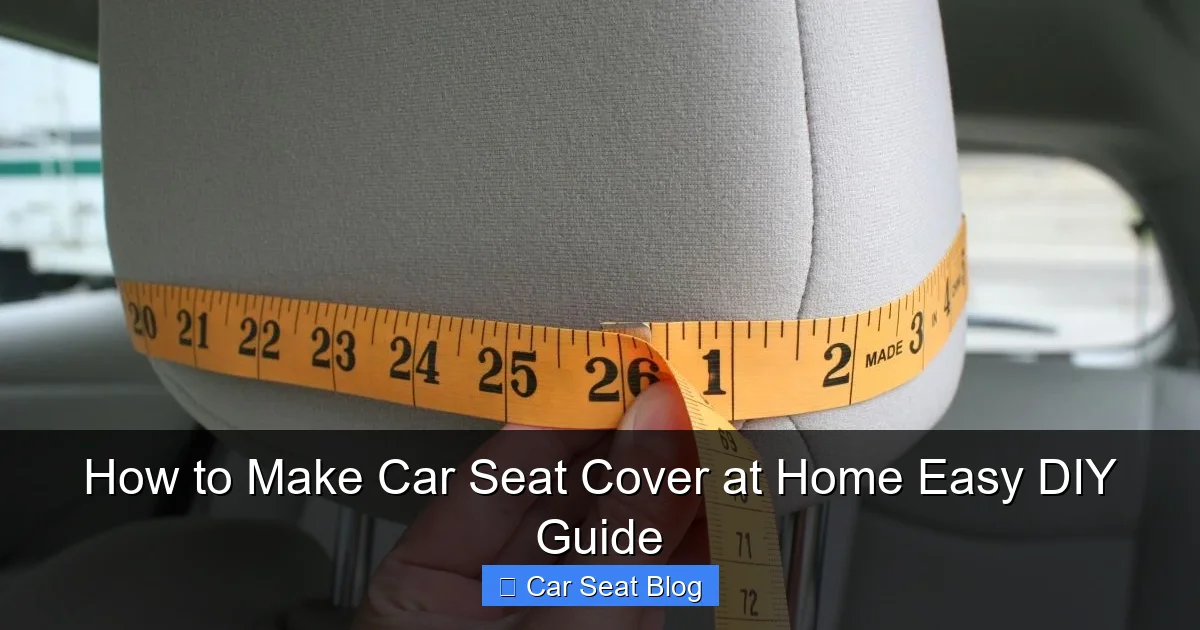
Step 1: Measure Your Car Seat
Accurate measurements are crucial for a snug fit. Start by removing any existing seat covers or accessories. Then, measure the following areas of your seat:
- Seat base (bottom cushion): Measure the length, width, and depth (front to back).
- Seat back (backrest): Measure the height, width, and depth.
- Headrest: Measure the width and height, and note if it’s removable.
- Side bolsters: These are the raised edges on the sides of the seat. Measure their height and length.
Pro Tip: Take photos of your seat from multiple angles. This helps when designing your pattern and ensures you don’t miss any contours or curves.
Create a Paper Pattern
Use an old bedsheet, wrapping paper, or large sheets of newspaper to create a template. Lay the fabric over your seat and trace the shape with chalk or a fabric marker. Include extra material (about 1–2 inches) around the edges for seam allowance or folding. Cut out the pattern and test it on the seat to confirm the fit.
Step 2: Choose the Right Fabric
The fabric you choose affects both durability and comfort. Here are some great options:
- Canvas: Heavy-duty and resistant to wear. Ideal for trucks or cars with kids and pets.
- Denim: Stylish and tough. Repurpose old jeans for an eco-friendly option.
- Microfiber: Soft, easy to clean, and great for absorbing spills.
- Outdoor fabric (e.g., Sunbrella): Water-resistant and UV-protected—perfect for sunny climates.
- Fleece or jersey knit: Stretchy and comfortable. Best for no-sew covers.
Tip: Pre-wash your fabric to prevent shrinking after installation. This ensures your cover won’t tighten or warp over time.
Step 3: Cut the Fabric
Place your paper pattern on the fabric and trace it with chalk. Add 1 inch (2.5 cm) around all edges for seam allowance if sewing, or ½ inch if using no-sew methods. Carefully cut out the pieces using sharp scissors or a fabric cutter.
You’ll typically need:
- One piece for the seat base
- One piece for the seat back
- Optional: Separate pieces for side bolsters or headrest
Pro Tip: Label each piece (e.g., “Base – Front”) to avoid confusion during assembly.
Step 4: Sew or No-Sew Assembly
Now comes the fun part—putting it all together. Choose the method that suits your skills and tools.
Sewing Method (Durable & Professional)
If you have a sewing machine, this method gives you a long-lasting, tailored fit.
- Pin the pieces together: Place the seat base and back pieces right sides together. Pin along the edges where they’ll be sewn.
- Sew the seams: Use a straight stitch with a ½-inch seam allowance. Backstitch at the beginning and end for strength.
- Clip curves: If your seat has rounded edges, make small cuts (not through the seam) to help the fabric lay flat.
- Turn right side out: Gently pull the cover through to reveal the finished side.
- Press with iron: Smooth out wrinkles for a crisp look.
Tip: Use a heavy-duty needle and polyester thread for extra durability.
No-Sew Method (Quick & Easy)
Perfect for beginners or those short on time. Here’s how:
- Use iron-on hem tape: Place the tape between fabric edges and iron over it according to package instructions. This creates a strong bond without sewing.
- Apply fabric glue: Use a fabric-specific adhesive to join seams. Apply sparingly and clamp or pin until dry.
- Stretch and wrap: For stretchy fabrics like fleece, simply wrap the fabric around the seat and secure with safety pins or elastic bands underneath.
Pro Tip: For a cleaner look, fold raw edges under before gluing or ironing.
Step 5: Add Finishing Touches
Make your cover functional and secure with these final steps:
- Add elastic or straps: Sew or glue elastic bands to the bottom edges to help the cover grip the seat.
- Create cutouts: Use scissors to carefully cut holes for seat belts, armrests, or adjustable headrests.
- Secure with safety pins: If your cover shifts, use discreet safety pins underneath to anchor it.
- Decorate (optional): Add patches, embroidery, or fabric paint for a personal touch.
Step 6: Install and Test
Carefully place the cover over your seat. Adjust it to ensure a snug fit. Sit in the seat and check for comfort and movement. Make minor adjustments if needed—trim excess fabric or add more elastic.
Pro Tip: Take your car for a short drive to test the cover under real conditions. This helps identify any loose areas or discomfort.
Troubleshooting Common Issues
Even the best DIY projects can hit snags. Here’s how to fix common problems:
- Cover slips or bunches up: Add more elastic, use non-slip shelf liner underneath, or secure with more safety pins.
- Fabric wrinkles or doesn’t lay flat: Re-iron the cover or adjust the seams. Stretchy fabrics may need extra tension.
- Holes don’t align with seat features: Double-check measurements and cut new openings carefully. Use a seam ripper to adjust existing holes.
- Fabric fraying: Apply fray-check liquid or fold edges under and glue/sew them down.
- Cover too tight or too loose: Re-measure and adjust the pattern. Add darts or pleats for a better fit.
Maintenance Tips
Keep your homemade car seat cover looking fresh with regular care:
- Vacuum weekly: Remove dust, crumbs, and pet hair.
- Spot clean spills immediately: Use a damp cloth and mild detergent.
- Machine wash (if fabric allows): Check the care label. Use cold water and air dry to prevent shrinking.
- Rotate or flip covers: If you make multiple covers, switch them to even out wear.
Conclusion
Making a car seat cover at home is a smart, satisfying way to protect your vehicle and express your style. With just a few materials and some patience, you can create a custom cover that fits perfectly, saves money, and lasts for years. Whether you choose to sew or go no-sew, this DIY project is accessible to everyone—no experience required.
So grab your fabric, measure your seat, and get creative. Your car (and your wallet) will thank you. Plus, you’ll have the pride of knowing you made it yourself. Happy crafting!