Adding an amplifier to your car stereo can dramatically improve sound quality, volume, and clarity. This guide walks you through the entire process, from choosing the right amp to wiring and testing your new setup safely and effectively.
How to Add Amplifier to Car Stereo for Better Sound
If you’re tired of weak, tinny audio from your car’s factory stereo, adding an amplifier is one of the best upgrades you can make. An amplifier boosts the power sent to your speakers, delivering richer bass, clearer vocals, and louder volume without distortion. Whether you’re a weekend cruiser or a music lover who demands concert-level sound, this guide will show you exactly how to add an amplifier to your car stereo—safely and effectively.
You don’t need to be a professional mechanic or audio expert to do this. With the right tools, a little patience, and this step-by-step guide, you can install an amplifier in just a few hours. We’ll cover everything from choosing the right amp to wiring it up and testing your new system.
Why Add an Amplifier?
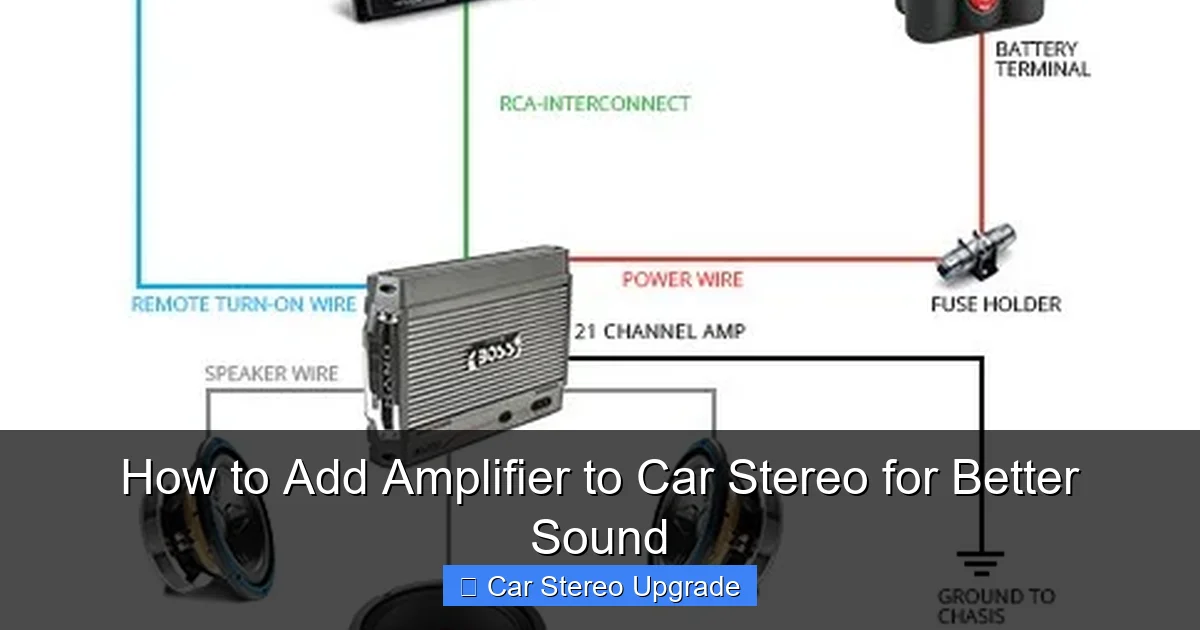
Visual guide about How to Add Amplifier to Car Stereo for Better Sound
Image source: howstereo.com
Factory car stereos often come with built-in amps that deliver low power—usually 10 to 20 watts per channel. That’s not enough to drive high-quality speakers or subwoofers effectively. When you push your stereo too hard, the sound distorts, and your speakers can get damaged.
An external amplifier provides clean, consistent power. It allows your speakers to perform at their best, especially at higher volumes. You’ll notice deeper bass, crisper highs, and a more balanced soundstage. Plus, adding an amp gives you the flexibility to upgrade your speakers later without replacing the whole system.
Choosing the Right Amplifier
Before you start installing, you need the right amp. Here’s what to consider:
Match Power to Your Speakers
Check your speaker’s RMS (continuous) power rating. Your amplifier should deliver power within that range. For example, if your speakers handle 50 watts RMS, choose an amp that outputs 40–60 watts per channel. Overpowering can damage speakers; underpowering causes distortion.
Number of Channels
– 2-channel amp: Great for front and rear speakers or bridging to power a subwoofer.
– 4-channel amp: Ideal for powering all four car speakers.
– 5-channel amp: Powers four speakers and a subwoofer—perfect for full-system upgrades.
Class of Amplifier
– Class AB: Good sound quality, moderate efficiency. Best for full-range speakers.
– Class D: Highly efficient, great for subwoofers. Runs cooler and uses less power.
Size and Mounting
Make sure the amp fits in your car. Common locations include under seats, in the trunk, or behind panels. Choose a well-ventilated spot to prevent overheating.
Gathering Your Tools and Materials
Here’s what you’ll need:
- Amplifier (matched to your system)
- Amplifier wiring kit (includes power cable, ground wire, RCA cables, fuse holder)
- Speaker wire (16–14 gauge for speakers, 12–10 gauge for subs)
- Wire strippers and crimping tool
- Screwdrivers and socket set
- Electrical tape and zip ties
- Multimeter (optional, for testing)
- Drill and drill bits (if mounting requires holes)
Tip: Buy a wiring kit rated for your amp’s power. A 500-watt amp needs thicker cables than a 200-watt one.
Step-by-Step Installation
Step 1: Disconnect the Battery
Safety first! Turn off your car and disconnect the negative terminal of the battery. This prevents accidental shorts or electrical damage while working.
Step 2: Plan Your Wiring Route
Decide where the amp will go and how you’ll run the wires:
– Power cable: From the battery to the amp (through the firewall).
– Ground wire: From the amp to a solid metal chassis point.
– RCA cables: From the head unit to the amp (usually along the same side as speaker wires).
– Remote turn-on wire: Tells the amp when to turn on (usually blue wire from head unit).
Avoid running power and signal cables together—they can cause interference and humming.
Step 3: Run the Power Cable
1. Remove the positive terminal cover on the battery.
2. Attach the fuse holder to the power cable (within 18 inches of the battery).
3. Connect the cable to the positive terminal and secure it.
4. Route the cable through the firewall (use an existing grommet or drill a small hole—seal it with silicone to prevent leaks).
5. Run the cable along the car’s frame to the amp location.
Step 4: Install the Ground Wire
1. Choose a clean, unpainted metal spot on the car’s chassis near the amp.
2. Sand the area lightly to ensure good contact.
3. Attach the ground wire to the chassis using a bolt and secure it tightly.
4. Connect the other end to the amp’s ground terminal.
A poor ground is a common cause of noise and amp failure—don’t skip this step!
Step 5: Connect RCA and Remote Wires
1. Run RCA cables from the head unit’s preamp outputs to the amp.
2. Connect the blue remote wire from the head unit to the amp’s remote terminal.
3. If your head unit doesn’t have preamp outputs, you may need a line output converter.
Step 6: Wire the Speakers
1. Disconnect the factory speaker wires from the head unit (if bypassing it).
2. Connect the speaker wires from the amp to your speakers.
3. Match polarity: positive to positive, negative to negative.
Tip: Use crimp connectors or solder joints for secure connections. Wrap with electrical tape.
Step 7: Mount the Amplifier
Secure the amp using screws or brackets. Make sure it’s stable and won’t rattle. Leave space around it for airflow.
Step 8: Double-Check All Connections
Before turning anything on:
– Ensure all wires are secure and insulated.
– Confirm the fuse is installed.
– Verify the ground is tight and clean.
Powering Up and Testing
Reconnect the Battery
Reattach the negative terminal and tighten it.
Turn On the System
Start the car and turn on the stereo. The amp should power up (you’ll see a light or hear a relay click).
Test the Sound
Play music at low volume. Check each speaker for sound and proper direction. Gradually increase volume to test for distortion or clipping.
If everything sounds good, you’re done! If not, move to troubleshooting.
Troubleshooting Common Issues
No Sound from Amp
– Check the fuse—replace if blown.
– Verify the remote wire is connected.
– Ensure the head unit is sending a signal (test with a multimeter).
Humming or Buzzing Noise
– Ground loop: Try a different ground point or use a ground loop isolator.
– Interference: Keep RCA cables away from power wires.
Amp Overheats or Shuts Off
– Check ventilation—don’t block airflow.
– Ensure the amp isn’t overloaded or underpowered.
– Verify speaker impedance matches amp specs.
Distorted Sound
– Lower the gain on the amp—don’t max it out.
– Check speaker wiring for shorts or loose connections.
Final Tips for Best Results
– Use a capacitor: For high-power systems, a capacitor helps stabilize voltage and prevent dimming lights.
– Tune the amp: Adjust gain, crossover, and bass boost to match your music and speakers.
– Protect your investment: Use a fuse on the power line and avoid overloading the electrical system.
Conclusion
Adding an amplifier to your car stereo is a game-changer for sound quality. It’s not as hard as it looks, and the results are worth every minute. With the right amp, proper wiring, and careful installation, you’ll enjoy powerful, clear audio that turns every drive into a concert on wheels.
Take your time, follow the steps, and don’t rush the grounding or wiring. Once everything is connected and tested, you’ll wonder how you ever drove without it. Turn up the volume—your ears will thank you.

