Want louder, richer sound from your car stereo? This guide shows you how to boost car stereo power safely and effectively. From upgrading your amp to improving wiring, you’ll learn practical steps to maximize audio performance without breaking the bank.
Key Takeaways
- Upgrade your amplifier: A dedicated amp provides clean, consistent power for louder, distortion-free sound.
- Use high-quality speaker wire: Thicker, oxygen-free copper wire reduces resistance and improves signal delivery.
- Check your head unit’s output: Factory stereos often lack power—consider an aftermarket unit with higher RMS output.
- Install a capacitor or battery: Stabilize voltage to prevent dimming lights and power drops during bass-heavy tracks.
- Match components properly: Ensure your speakers, amp, and head unit are compatible for optimal performance.
- Seal and insulate your cabin: Reduce road noise and improve acoustics for a more immersive listening experience.
- Tune your system: Use EQ settings and gain adjustments to balance sound and prevent clipping.
How to Boost Car Stereo Power for Better Sound
If your car stereo sounds weak, muffled, or distorts at high volumes, you’re not alone. Many factory audio systems are built for cost-efficiency, not performance. But the good news? You can significantly boost your car stereo power with a few smart upgrades and tweaks. Whether you’re a weekend cruiser or a bass-loving audiophile, this guide will walk you through practical, step-by-step methods to get louder, clearer, and more dynamic sound from your ride.
In this guide, you’ll learn how to increase your stereo’s power output, improve sound quality, and avoid common pitfalls. We’ll cover everything from amplifier upgrades to wiring improvements, power stabilization, and tuning tips. By the end, you’ll have a system that not only plays louder but sounds better too—without frying your car’s electrical system.
Step 1: Upgrade Your Amplifier
The heart of any powerful car audio system is the amplifier. Most factory stereos have built-in amps that deliver only 10–20 watts RMS per channel—barely enough to drive decent speakers. To truly boost car stereo power, you need a dedicated external amplifier.
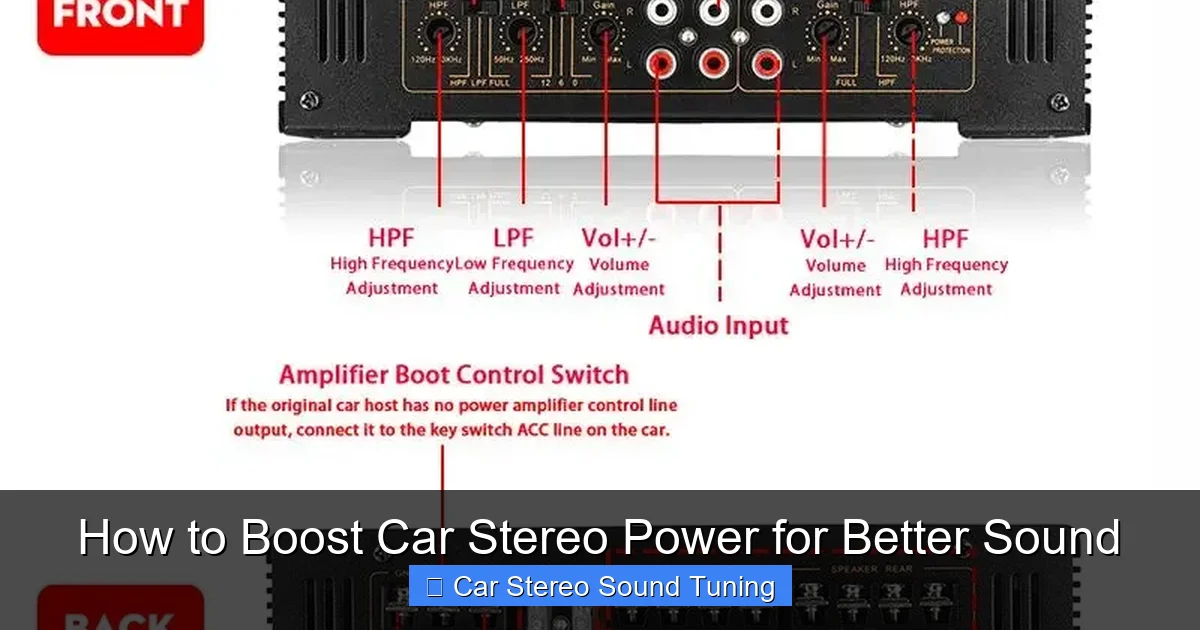
Visual guide about How to Boost Car Stereo Power for Better Sound
Image source: i2.wp.com
Choose the Right Amp
Look for an amplifier that matches your speaker setup. For example, a 4-channel amp works well for powering front and rear speakers, while a mono amp is ideal for subwoofers. Pay attention to RMS power ratings—not peak power—since RMS reflects continuous, reliable output. Aim for an amp that delivers at least 75–100 watts RMS per channel for noticeable improvement.
Install the Amplifier Safely
Mount the amp in a well-ventilated area, away from heat and moisture—under a seat or in the trunk are common spots. Use a wiring kit with the correct gauge power and ground wires (usually 4–8 AWG for most systems). Connect the remote turn-on wire to your head unit so the amp powers on with the stereo. Always install an inline fuse near the battery to protect against shorts.
Example Setup
Say you have a pair of 6.5-inch component speakers in the front. A 2-channel amp like the Rockford Fosgate R2-500X2 delivers 100 watts RMS per channel—perfect for crisp, powerful sound without distortion.
Step 2: Improve Your Wiring
Even the best amp won’t perform well with thin, low-quality wiring. Factory wiring is often too thin and made of inferior materials, creating resistance that limits power flow.
Upgrade Power and Ground Wires
Replace thin factory wires with thicker, high-strand copper cables. Use 4-gauge wire for amps under 500 watts and 0-gauge for high-power systems. Keep power and ground wires as short as possible to reduce resistance. Ground the amp directly to the chassis using a clean, unpainted metal spot—sand the area if needed for a solid connection.
Use Quality Speaker Wire
Don’t skimp on speaker wire. Use 12–14 gauge oxygen-free copper (OFC) wire for runs over 10 feet. Avoid CCA (copper-clad aluminum) wire—it’s cheaper but less conductive and prone to failure. Secure wires with zip ties or clips to prevent rattling and damage.
Tip: Avoid Daisy-Chaining
Never daisy-chain multiple speakers on one channel unless they’re wired in parallel with proper impedance matching. Mismatched loads can overheat your amp or damage speakers.
Step 3: Upgrade Your Head Unit
Your head unit (the stereo itself) is the command center of your audio system. If it’s weak, your entire system suffers—even with a great amp.
Look for High RMS Output
Factory head units often have low preamp voltage (2–4 volts), which limits signal clarity. Aftermarket units offer 4–8 volts or more, giving your amp a cleaner signal to amplify. Choose a unit with at least 20–25 watts RMS per channel and multiple preamp outputs if you plan to add amps.
Consider Digital Signal Processing (DSP)
Some high-end head units include built-in DSP, allowing you to fine-tune EQ, time alignment, and crossovers. This helps optimize sound for your car’s unique acoustics. Units like the Pioneer DMH-WT7600NEX offer excellent sound control and smartphone integration.
Installation Tip
Use a wiring harness adapter to connect your new head unit without cutting factory wires. This makes installation reversible and protects your car’s electrical system.
Step 4: Add a Capacitor or Secondary Battery
When you crank the volume—especially with heavy bass—your car’s electrical system may struggle to keep up. This can cause dimming headlights, voltage drops, and even amp shutdowns.
Install a Capacitor
A power capacitor stores energy and releases it quickly during power-hungry moments. A 1-farad capacitor is enough for systems under 500 watts. Connect it near the amplifier with proper fusing. While not a permanent fix, it helps smooth out voltage spikes.
Upgrade to a High-Output Alternator or Battery
For serious power demands (1000+ watts), consider upgrading your alternator or adding a secondary AGM battery. A high-output alternator (like 150–200 amps) ensures your system gets consistent power without draining the main battery. A secondary battery acts as a buffer, especially during long bass drops.
Example
If you’ve installed a 1000-watt subwoofer amp, your stock alternator may not keep up. A Mechanical Manufacturing 200A alternator can provide the extra juice needed for stable performance.
Step 5: Match Your Components
Even with great parts, mismatched components can ruin your sound. Always check compatibility between your head unit, amp, and speakers.
Check Impedance and Power Handling
Speakers have an impedance rating (usually 2, 4, or 8 ohms) and a power handling range (in watts). Your amp should match or slightly exceed the speaker’s RMS rating. For example, don’t power a 50-watt RMS speaker with a 200-watt amp unless you carefully control the gain.
Use Crossovers
Crossovers direct the right frequencies to the right speakers. Use a high-pass filter on your main speakers to block bass (which they can’t handle) and a low-pass filter on your subwoofer. This prevents distortion and improves clarity.
Tip: Bi-Wiring and Bi-Amping
For advanced users, bi-wiring (using separate wires for tweeters and woofers) or bi-amping (using separate amps) can improve sound separation and detail.
Step 6: Improve Cabin Acoustics
Boosting power isn’t just about hardware—your car’s interior affects sound quality too. Road noise, vibrations, and poor speaker placement can mask even the best audio.
Soundproof Your Doors and Floor
Apply sound-deadening material like Dynamat or Noico to doors, floor, and trunk. This reduces vibration and outside noise, making your music clearer and more immersive. Focus on door panels where speakers are mounted—this improves bass response and reduces distortion.
Seal Speaker Mounts
Use foam gaskets or speaker adapters to create an airtight seal between the speaker and door panel. This prevents sound leakage and improves bass performance.
Adjust Speaker Placement
Angle front speakers toward the listener (usually the driver) for better imaging. Avoid placing subs in the trunk without proper enclosure tuning—sealed or ported boxes affect sound differently.
Step 7: Tune Your System
Even the best setup sounds bad if it’s not tuned properly. Take time to adjust settings for balanced, distortion-free sound.
Set the Gain Correctly
Don’t max out the gain—this causes clipping and damages speakers. Use a multimeter or test tone to set gain so the amp receives the full signal without distortion. Start low and increase gradually while playing music you know well.
Use the EQ Wisely
Boost only what’s needed. Excessive bass can muddy the sound. Use a flat EQ as a starting point, then adjust based on your music and preferences. Many head units and amps have built-in EQ presets—experiment to find what sounds best.
Time Alignment and Crossover Settings
If your system supports it, adjust time alignment so sound from all speakers reaches your ears at the same time. Set crossovers so tweeters handle highs, mids handle vocals, and subs handle bass—no overlap, no gaps.
Troubleshooting Common Issues
Even with careful installation, problems can arise. Here’s how to fix common issues:
- Blowing fuses: Check for short circuits, loose wires, or incorrect wiring. Ensure your amp’s power requirements match your electrical system.
- Distorted sound: Lower the volume or gain. Check speaker polarity—reversed wires cause phase cancellation.
- No sound: Verify remote turn-on wire is connected. Check fuses and ground connections.
- Dimming lights: Your electrical system is overloaded. Add a capacitor or upgrade your alternator.
- Hissing or noise: Ground loops or poor shielding may be the cause. Use a ground loop isolator or re-route signal cables away from power wires.
Conclusion
Boosting your car stereo power doesn’t require a professional installer or a huge budget. With the right upgrades—like a quality amplifier, proper wiring, and a capable head unit—you can transform your factory sound into a concert-on-wheels experience. Remember to match your components, stabilize your power supply, and tune your system for the best results.
Start small if you’re new to car audio. Upgrade your amp and wiring first, then move on to capacitors, soundproofing, and tuning. With each step, you’ll hear the difference. And most importantly—have fun! Your car is more than transportation. It’s your personal soundstage. Make it loud, make it clear, and make it yours.
🎥 Related Video: Useful device for good sound quality in car music system🚘🌟 #shorts #viral
📺 CarsXoholic
A high to low converter, commonly used in car music systems, serves a crucial role in integrating aftermarket amplifiers with …

