Paint correction mistakes usually come from poor prep, the wrong pad-and-polish choice, too much pressure, and weak inspection lighting. The safest path is to start gently, test the finish carefully, and protect the paint properly afterward.
Paint correction can transform tired paint, but it can also create new damage if the process is rushed or misunderstood. The biggest Paint Correction Mistakes to Avoid usually happen before polishing even starts, or when results are judged too quickly under the wrong light.
- Prep first: Wash and decontaminate before polishing.
- Test spot: Start with the least aggressive setup.
- Inspect properly: Check under LED and sunlight.
- Protect after: Seal or coat the finish, then wash gently.
Paint Correction Mistakes to Avoid: What Flawless Results Actually Require
Flawless paint correction is less about aggressive polishing and more about control, patience, and inspection. The goal is to remove defects while preserving as much clear coat as possible, because every pass changes the finish in some way.
That is why good detailing is as much about restraint as it is about technique. If you want a safer foundation, it helps to understand related prep habits first, including common clay bar mistakes to avoid and the basics of washing without adding fresh scratches.
Understanding Paint Correction in 2025: What It Fixes and What It Can Ruin
Paint correction is the process of refining a vehicle’s clear coat to reduce visible defects like swirls, light scratches, oxidation, and haze. It can dramatically improve gloss and clarity, but it cannot magically restore paint that is already too thin, badly repainted, or deeply damaged.
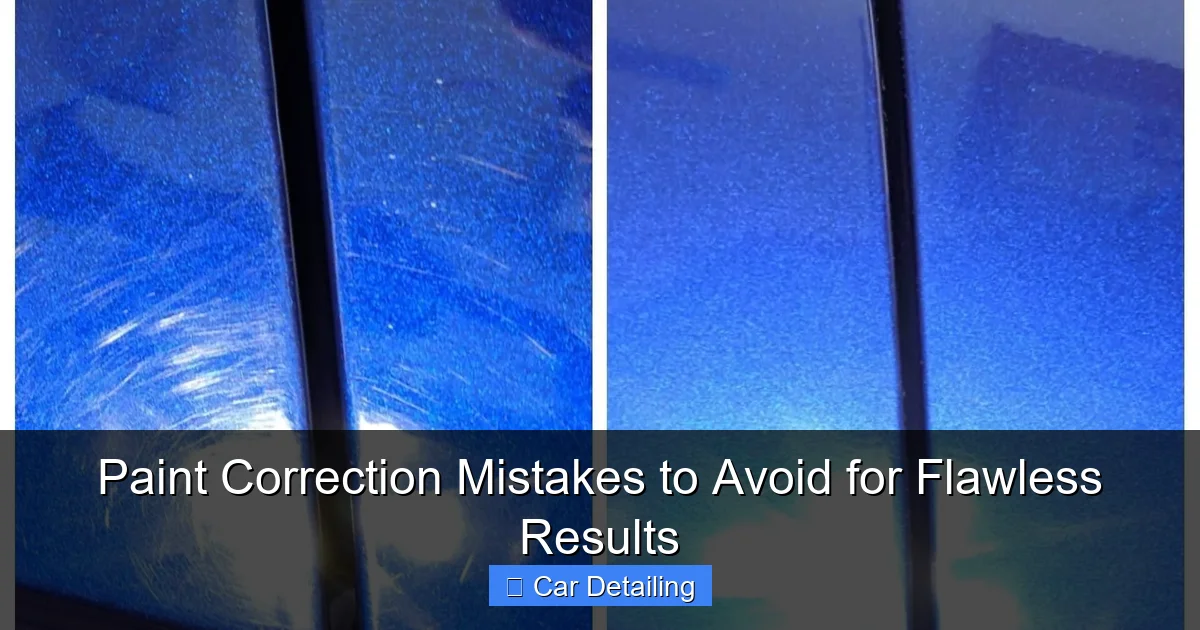
Visual guide about Paint Correction Mistakes to Avoid for Flawless Results
Image source: aautodetail.com
The modern mistake is assuming every finish can tolerate the same approach. In reality, today’s paint systems vary widely in hardness, thickness, and sensitivity, so the safest method depends on the vehicle rather than a one-size-fits-all routine.
How swirl marks, scratches, oxidation, and haze differ
Swirl marks are usually fine, circular micro-scratches that show up in direct light. They often come from poor washing, dry wiping, or dirty towels rather than a single dramatic incident.
Scratches are more defined and can be deeper than swirls, which means some will improve with polishing while others may remain visible. Oxidation is a dull, weathered surface condition, while haze often comes from polishing residue, pad choice, or finishing too aggressively.
Knowing the difference matters because the wrong fix can waste clear coat without solving the actual problem. A heavy compound may remove haze poorly or make soft paint look worse, while a gentle polish may be too mild for deeper defects.
Why modern clear coats demand a more careful approach
Many newer finishes are designed to be durable, but durability does not always mean easy correction. Some clear coats are very hard and need a more deliberate process, while others are soft and mar easily if you overwork them.
That means speed and pressure should be adjusted to the paint, not to your expectations. A method that works on one car may leave holograms, burn-through risk, or excessive micromarring on another.
Prepping the Vehicle the Right Way Before Any Polishing Begins
Preparation is where many of the most expensive mistakes happen. If the surface still has bonded contamination, grime, or embedded debris, polishing can drag that material across the panel and create fresh defects.
Before correction, the paint should be as clean and as visually inspectable as possible. If you need a broader wash foundation, a related guide on hand wash mistakes to avoid can help reduce the chance of adding scratches before polishing starts.
Skipping decontamination and how it creates new defects
Skipping decontamination is one of the easiest ways to turn a correction job into a cleanup job. Dirt, rail dust, tar, and other bonded contaminants can interfere with polishing and cause the pad to catch or skip.
Even if the panel looks clean, it may still have rough contamination that you can feel but not always see. Polishing over that surface can grind debris into the clear coat and leave marks that were not there before.
Why washing, clay barring, and inspection lighting matter
A proper wash removes loose grime, but it does not remove everything that is bonded to the paint. Clay barring or another safe decontamination step helps create a smoother surface so the polish can work evenly.
Inspection lighting matters just as much because defects that vanish in shade often reappear under direct light. Use a bright LED, a controlled garage light, and if possible natural sunlight to see the real finish before and after each stage.
Inspect the paint after washing and again after decontamination. If the finish still feels rough, do not move straight to polishing.
The Most Common Paint Correction Mistakes to Avoid During Polishing
Once polishing begins, the biggest risks are usually technique errors rather than product failure. The machine, pad, compound, and paint all need to work together, and changing one variable can change the result completely.
For beginners, this is where a slow, test-first approach matters most. Start with the least aggressive combination that can achieve the result you want, then step up only if needed.
Using the wrong pad and compound combination
A heavy compound on a cutting pad can remove defects quickly, but it may also leave micro-marring or a dull finish that requires additional refinement. On the other hand, a finishing polish on a soft pad may not correct enough to justify the time.
The mistake is not just choosing the wrong product, but skipping a test spot. One panel can behave very differently from the next, especially if the car has repainted sections, different panel ages, or mixed paint hardness.
Applying too much pressure or too much speed
More pressure does not always mean more correction. Excess force can stall a dual-action polisher, overheat the surface, and make the finish harder to refine later.
Too much machine speed can also create heat and reduce control, especially near trim, curves, and edges. The safest approach is controlled movement, moderate pressure, and enough passes to let the product do the work.
Working on dirty pads and overheating the paint
A loaded pad loses cutting efficiency and can start smearing spent polish, paint residue, and removed clear coat back onto the surface. That often leads to hazing, inconsistent correction, and more passes than necessary.
Overheating the paint is a real concern, especially on thin panels, edges, and horizontal surfaces exposed to sun. If the panel feels too hot to comfortably keep your hand on, stop and let it cool before continuing.
Ignoring panel edges, body lines, and repainted surfaces
Edges and body lines have less clear coat than flat areas, so they are easier to damage. Repainted panels can also behave unpredictably, since the finish may be softer, thinner, or not fully uniform.
Those areas deserve lighter pressure, slower passes, and extra caution. If you do not know the paint history, assume the panel is more delicate than it looks and avoid aggressive correction near sharp contours.
Do not chase perfection on every edge and corner. One over-polished body line can create permanent damage that is harder to fix than the original defect.
Judging Results Incorrectly: Why “Looks Good in the Shade” Can Be Misleading
One of the most frustrating mistakes in paint correction is thinking the work is done when the car looks great in soft light. Shade can hide holograms, leftover haze, and uneven refinement that show up later in harsher conditions.
That is why finishing by eye alone is unreliable. A panel should be checked from multiple angles, at different distances, and under different lighting conditions before calling it complete.
Holograms, micromarring, and artificial lighting traps
Holograms are streaky, ghost-like marks that can appear after machine polishing, especially with rotary tools or poor finishing technique. Micromarring is finer and may look like faint webbing or dull texture under direct light.
Artificial lighting can also be misleading if it is too narrow, too warm, or placed at the wrong angle. A panel can look perfect under one lamp and reveal defects immediately under another.
Why proper inspection under LED and sunlight is essential
LED inspection lights help expose fine defects that normal garage lighting hides. Sunlight, when available, is still one of the clearest ways to judge whether the finish is truly refined or only looks good indoors.
Use both if possible. The point is not to chase a flawless reflection in every condition, but to confirm that the correction is actually consistent and not just hiding under soft light.
DIY vs Professional Paint Correction: Cost, Risk, and When to Call a Pro
DIY correction can be a smart way to handle light defects, but the risk rises quickly when the paint is thin, the damage is deep, or the vehicle has valuable finish work. The real question is not whether you can polish, but whether you can safely improve the finish without making it worse.
For many owners, the safest route is to start with a small test area and stop if the result requires more experience than you have. When the paint history is unknown or the vehicle is especially valuable, professional help is often the better risk decision.
| Option | Best For | Limit |
|---|---|---|
| Light DIY correction | Minor swirls and basic gloss improvement | May not remove deeper defects |
| Intermediate DIY correction | Enthusiasts with test-spot discipline | Higher risk of haze or edge damage |
| Professional correction | Delicate paint, deep defects, or high-value vehicles | Usually costs more than DIY materials |
Typical cost differences for light, medium, and heavy correction
Costs vary by vehicle size, paint condition, region, and whether the work includes protection afterward. Light correction is usually less involved than medium or heavy correction, but the price difference can grow quickly when multiple stages are needed.
Because pricing varies so much, it is better to compare scope than to focus on a single number. Ask what is included, how many steps are planned, and whether the shop will inspect the paint before committing to aggressive work.
Paint correction pricing can change based on paint hardness, defect depth, and whether the vehicle needs extra prep or protection after polishing.
When a beginner should stop and seek expert help
If you notice the paint getting hot, the finish becoming hazier instead of clearer, or defects not improving after a sensible test spot, it is time to pause. Those signs usually mean the current approach is too aggressive, too mild, or simply wrong for the paint.
Beginners should also stop if they are unsure about paint thickness, repainted panels, or how much clear coat remains. At that point, guessing can be more expensive than getting guidance from someone with the right tools and experience.
Situations where professional correction is the safer choice
Professional correction is often the safer choice for classic cars, freshly repainted panels, heavily swirled black paint, or vehicles with visible sanding marks and deeper defects. It is also wise when the surface has already been polished multiple times and may have limited clear coat left.
If the car has sentimental or resale value, the risk calculation changes quickly. A careful pro may still recommend a conservative result rather than a perfect-looking finish that compromises long-term paint health.
Protecting the Finish After Correction to Avoid Repeating the Same Mistakes
Correction is only half the job. Without proper protection and washing habits, the same swirls and haze can return surprisingly fast, especially if the car is washed with dirty mitts, harsh towels, or poor technique.
Aftercare should support the finish, not undo it. That means using gentle maintenance products and keeping the washing process as low-risk as possible.
Sealants, ceramic coatings, and maintenance washing basics
Sealants and ceramic coatings can help protect the finish from environmental fallout and make cleaning easier, though neither one makes a car scratch-proof. Their real value is reducing how quickly contamination bonds to the surface and how much friction is needed during washing.
Maintenance washing still matters more than any coating. If you want the correction to last, follow a safe routine, use clean towels, and avoid habits that reintroduce scratches during routine cleaning.
How improper aftercare can undo correction work fast
Using dirty wash media, wiping dry dust off the paint, or letting grime build up for too long can quickly bring back visible defects. Even a well-corrected finish will degrade if the wash process is rough.
That is why aftercare should be treated as part of the correction plan. If you are still refining your wash process, it may help to review a related guide on Ceramic Coating Guide — Complete Guide”>Ceramic Coating Guide Explained Simply”>ceramic coating maintenance and another on weekly wash routine mistakes and fixes so the finish stays protected longer.
Final Recap: The Smart Way to Correct Paint Without Damaging It
The smartest paint correction process is careful, incremental, and inspection-driven. Most damage comes from skipping prep, using the wrong combination, overworking the paint, or trusting a finish that only looks good in the shade.
If you stay conservative, test your process, and protect the result afterward, you can improve gloss without creating new problems. When the paint is delicate, heavily damaged, or uncertain, calling a professional is often the safest move.
Key mistakes to avoid for consistent, flawless results
Avoid skipping decontamination, using aggressive products too early, applying excessive pressure, and ignoring edges or repainted panels. Also avoid judging the finish by one light source or one viewing angle.
Those are the mistakes that most often turn a correction job into a repair problem. Careful prep and patient inspection matter more than trying to remove every defect in a single pass.
Quick takeaways for safer, better detailing outcomes
Start with the least aggressive method that can do the job, then inspect the result under proper lighting. Keep pads clean, control heat, and protect the finish once the correction is complete.
That approach will not only improve the look of the paint, but also reduce the chance of repeating the same mistakes on the next detail.
Frequently Asked Questions
Skipping proper prep is one of the biggest mistakes. If the paint is not washed and decontaminated first, polishing can drag debris across the surface and create new defects.
Yes, if it is done too aggressively or too often. Overheating the paint, using the wrong pad, or polishing edges too hard can remove too much clear coat.
Usually, yes, if the paint has bonded contamination. Clay barring helps create a smoother surface so polishing is more even and less likely to catch debris.
Check the finish under LED lighting and sunlight if possible. If you still see holograms, haze, or micromarring in different lighting, the job may need more refinement.
Beginners should usually start with light correction and a small test spot. Heavy correction increases the risk of heat, haze, and clear coat damage, so it is often better left to a professional.
Use safe washing habits, clean towels, and a protective product such as a sealant or ceramic coating. Good aftercare helps prevent the same swirls and scratches from returning quickly.

