Quick Summary: The difference between 12V and 24V is voltage and how it affects power, wiring, and starting performance. Cars use 12V. Heavy trucks use 24V. Higher voltage cuts current, reduces cable size, and improves efficiency. Never jump a 12V car with 24V. Test with a multimeter and match your battery, charger, and accessories to your system.
If your car won’t start, or you’re adding gear to a truck or RV, you’ll run into a big choice: 12V or 24V. The Difference between 12V and 24V can change how you start your engine, wire accessories, and charge your battery. Don’t worry. I’ll keep it simple and practical. You’ll learn how they compare, how to test voltage, safe jump-start steps, and which system fits your life.
What “12V” and “24V” Actually Mean
Voltage is electrical pressure. More voltage pushes the same power with less current. That means less heat, thinner cables, and better efficiency. Most passenger cars use a 12-volt battery. Many heavy-duty vehicles use 24 volts because they need big starting power without massive cables.
- 12V system: Standard for cars, SUVs, most pickups, motorcycles, many boats, and RV “house” batteries.
- 24V system: Common in semis, delivery trucks, buses, some off-road equipment, and certain marine or RV setups.
- Same job, different tools: Both run starters, lights, and electronics. The main change is how current flows through the wiring.
Difference between 12V and 24V: Quick Comparison
Here’s the fast way to see which system fits your needs. This table shows why fleets love 24V and why everyday drivers stick with 12V.

| Feature | 12V System | 24V System |
|---|---|---|
| Typical vehicles | Cars, SUVs, light pickups, motorcycles, small boats, most RV house systems | Semis, medium/heavy trucks, buses, military/off-road, some marine/RV power systems |
| Starting power approach | Higher current through thicker cables | Lower current for the same power, thinner cables |
| Cable size | Thicker to handle amps (more weight and cost on long runs) | Thinner for the same load (lighter, cheaper long runs) |
| Electrical losses (heat) | Higher on long runs | Lower on long runs |
| Accessory availability | Huge selection (chargers, lights, audio, dash cams) | More limited; often needs a DC-DC converter for 12V accessories |
| Alternator output (engine running) | Typically 13.8–14.7V | Typically 27.6–29.4V |
| Jump-start risk | Low if using 12V source and correct steps | High if misused; never jump a 12V car with 24V |
| Best for | Daily drivers, short cable runs, universal accessory support | Heavy-duty starting, long cable runs, fleet vehicles |
| Main drawback | Higher current can stress cables on big loads | Accessory compatibility; mistakes can be costly |
| Main keyword | Difference between 12V and 24V: 24V uses higher voltage to reduce current and losses; 12V is universal for light vehicles | |
When Your Car Won’t Start: Is It a 12V or 24V Problem?
No-starts are scary. The good news: the basics are the same. A weak battery, corroded terminals, bad cables, a failing starter, or a charging issue. Whether you drive a 12V sedan or a 24V box truck, you can run a simple check at home in minutes.
Fast checklist before you grab tools
Do this quick scan to narrow the problem. You’ll spot most issues fast, and you won’t waste time or money.

- Lights dim or flicker? Likely low battery voltage or poor connections.
- Single click, no crank? Battery weak or starter solenoid issue.
- Rapid clicks? Very low battery or bad connection (common on 12V cars after lights were left on).
- No sound at all? Dead battery, blown fuse, or security/ignition problem.
- Battery age 4+ years (12V) or 3–5 years (24V fleets)? Suspect wear-out.
- Recent cold snap? Batteries lose power in cold; oil thickens; starts get harder.
Tools you’ll want handy
A few basic tools help you diagnose 90% of electrical headaches. You don’t need fancy gear.
- Digital multimeter (auto-ranging is fine)
- Jumper cables or a jump pack rated for your system voltage
- Wire brush or battery terminal cleaner
- Dielectric grease and basic hand tools
- Work light and safety glasses
How to Test Battery Voltage (12V and 24V)
Voltage tells the story. A quick multimeter test confirms if your battery is charged, weak, or if your alternator is doing its job. Test at rest first, then with the engine running.
- Set your multimeter to DC volts (V⎓).
- Turn the vehicle off for at least 10 minutes to let surface charge settle.
- Touch red probe to the battery positive (+) and black to negative (–).
- Read the number:
- 12V battery: Healthy is about 12.6–12.8V at rest.
- 24V system: Healthy is about 25.2–25.6V at rest (two 12V batteries in series).
- Start the engine (or have a helper crank if it won’t start):
- 12V running: About 13.8–14.7V shows the alternator is charging.
- 24V running: About 27.6–29.4V shows charging.
- If voltage is low at rest and stays low while running, your alternator or wiring may be failing.
| Battery State | 12V System (engine off) | 24V System (engine off) | Notes (good vs bad) |
|---|---|---|---|
| Fully charged | 12.6–12.8V (AGM up to ~12.9V) | 25.2–25.6V | Good. If it still cranks slow, check cables and starter. |
| 75% charged | ~12.4V | ~24.8V | Usable. Consider charging soon, especially in cold weather. |
| 50% charged | ~12.2V | ~24.4V | Borderline. Hard starts likely. Charge the battery. |
| Low/Discharged | 12.0V or lower | 24.0V or lower | Bad. Jump start or charge. Check for parasitic drain. |
| Charging voltage (engine running) | 13.8–14.7V | 27.6–29.4V | Good alternator output range in warm temps. |
Jump-Starting Safely: 12V vs 24V
Jump-starting sounds simple. But mixing system voltages can fry electronics in a blink. Follow these rules to protect your car, your wallet, and your day.
12V-to-12V jump-start (standard car)
These are the classic steps most drivers use. Keep the sequence right to avoid sparks and damage.

- Park close, engines off, parking brakes on. Donor car must also be 12V.
- Red clamp to dead battery positive (+).
- Other red clamp to donor battery positive (+).
- Black clamp to donor battery negative (–).
- Final black clamp to a clean metal ground on the dead car (not the battery post).
- Start the donor, idle for 2–3 minutes, then try the dead car.
- Once it runs, remove cables in reverse order. Drive 20–30 minutes to recharge.
Never jump a 12V car with a 24V source
24V into a 12V car can destroy ECUs, sensors, radios, and more. If a truck has a 24V system, do not use it to jump a 12V car unless it has a dedicated 12V tap or DC-DC jump function designed for that purpose.
Jump-starting a 24V truck
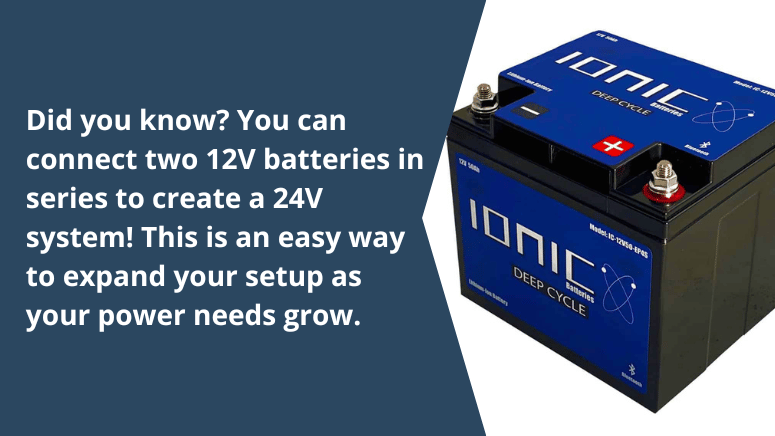
Use a proper 24V jump pack or another 24V vehicle. Many 24V trucks use two 12V batteries in series. You can use two 12V vehicles or batteries in series to create 24V, but only if you understand series connections and follow safe procedures.
- Match voltages. 24V to 24V only.
- Follow the same clamp order as 12V, but on the 24V posts.
- Avoid tapping just one battery in a 24V series pair. That causes imbalance and early failure.
For more safe jump-start tips and battery basics, review guidance as explained by AAA, which covers step-by-step procedures and common mistakes in plain language.
Alternators, Starters, and Wiring: What Changes with 24V
Higher voltage means less current for the same power. Think of pushing water through a hose. A stronger pump (more voltage) doesn’t need as wide a hose (less current). This ripple effect changes cable size, starter design, and alternator output.
- Starters: A 24V starter can deliver the same cranking power with about half the current of a 12V starter. That reduces cable heat and voltage drop on long runs.
- Alternators: A 24V alternator outputs around 28V when charging. For the same wattage, it can use smaller-gauge output wiring than a 12V alternator.
- Cables: On big vehicles, shaving a few wire sizes saves money and weight. That’s one reason fleets like 24V.
- Heat and voltage drop: Less current means less heat, less drop, and better performance under big loads.
Example: A 3 kW starter needs about 250 amps at 12V, but only about 125 amps at 24V. Same power, less current stress. Over long cable runs, that’s a big win.
Which Is Better for You? Use Cases and Buying Advice
Most drivers are best served by 12V. It’s universal, easy to find parts for, and simple to service. If you run heavy equipment or a big fleet, 24V can be smarter. Here’s how to decide.
Choose 12V if you:
Stick with 12V if you want the most options and least hassle. It’s the right call for daily life.
- Drive a standard car, SUV, or light pickup.
- Use common accessories: dash cams, phone chargers, seat heaters, fridges.
- Value easy roadside support and cheap parts.
- Rarely run long cables to big loads.
Choose 24V if you:
Go 24V when you need heavy-duty performance and longer cable runs. Many commercial vehicles already use it.
- Operate medium/heavy trucks, buses, or off-road gear.
- Run long high-amp cables (winches, inverters) and want lower losses.
- Need more efficient starts in harsh conditions.
- Have fleet support or a shop familiar with 24V service.
RV and marine notes
Most RV “house” banks are 12V for accessory support. Bigger rigs sometimes use 24V house banks for efficiency, then step down to 12V for devices. Boats often use 12V but larger vessels may run 24V or 48V for thrusters and windlasses.
- Plan your voltage around the farthest high-load device. Long wire runs favor higher voltage.
- Budget for a proper DC-DC converter if mixing 12V devices with a 24V bank.
Using 12V Accessories on a 24V Vehicle (and Vice Versa)
Mixing voltages is doable with the right gear. The secret is a DC-DC converter. It steps 24V down to a clean, stable 12V. Never power 12V gear by tapping one battery in a 24V series pair—you’ll unbalance the bank and kill a battery early.
How to add a DC-DC converter for 24V to 12V
This simple install keeps your 12V accessories safe and your 24V bank healthy.
- Choose a converter sized for your load (add up watts; divide by 12V to get amps). Add 25–50% headroom.
- Mount it in a ventilated, dry spot close to the 24V source.
- Fuse the 24V positive input as close to the battery as possible.
- Wire input positive and negative to the 24V battery bank.
- Wire the 12V output to a small fuse panel for your accessories.
- Label the panel “12V from 24V converter” to avoid confusion later.
- Examples that need converters: dash cams, phone chargers, car stereos, many LED light bars, small fridges.
- Reverse step (12V to 24V): Use a booster only when required, and size it for the load.
Common Problems, Causes, and Fixes in 12V vs 24V Systems
Both systems fail in similar ways. The difference is often how severe the damage is if voltages get mixed. Use this table to go from symptom to solution fast.
| Symptom | Likely Cause | 12V Fix | 24V Fix |
|---|---|---|---|
| Slow crank | Weak battery, corroded terminals, undersized cables, cold weather | Charge/test battery, clean terminals, replace worn cables | Same steps; also verify series connections are tight and even |
| Click, no start | Low voltage or bad starter solenoid | Jump/charge; test starter draw | Check both batteries; ensure balanced voltages in series |
| Dead after sitting | Parasitic drain or old battery | Measure parasitic draw; pull fuses to find the source; replace battery if old | Measure draw across the 24V bank; install a master disconnect if needed |
| Dim lights at idle | Weak alternator output or loose belt | Check belt; test alternator (13.8–14.7V) | Check belt; test alternator (27.6–29.4V) |
| Electronics fried after jump | Wrong system voltage used | ECU/audio replacement; verify fuses; follow proper 12V jump steps next time | Train team on 24V only; add labels on battery posts and jump points |
| One of two series batteries fails early | Imbalanced charging or tapping one for 12V loads | N/A | Replace both as a matched pair; stop tapping one battery; use a DC-DC converter |
| Burning smell from cables | Undersized wire or loose connection heating up | Up-size cable; clean/tighten lugs | Same; 24V reduces current but bad joints still overheat |
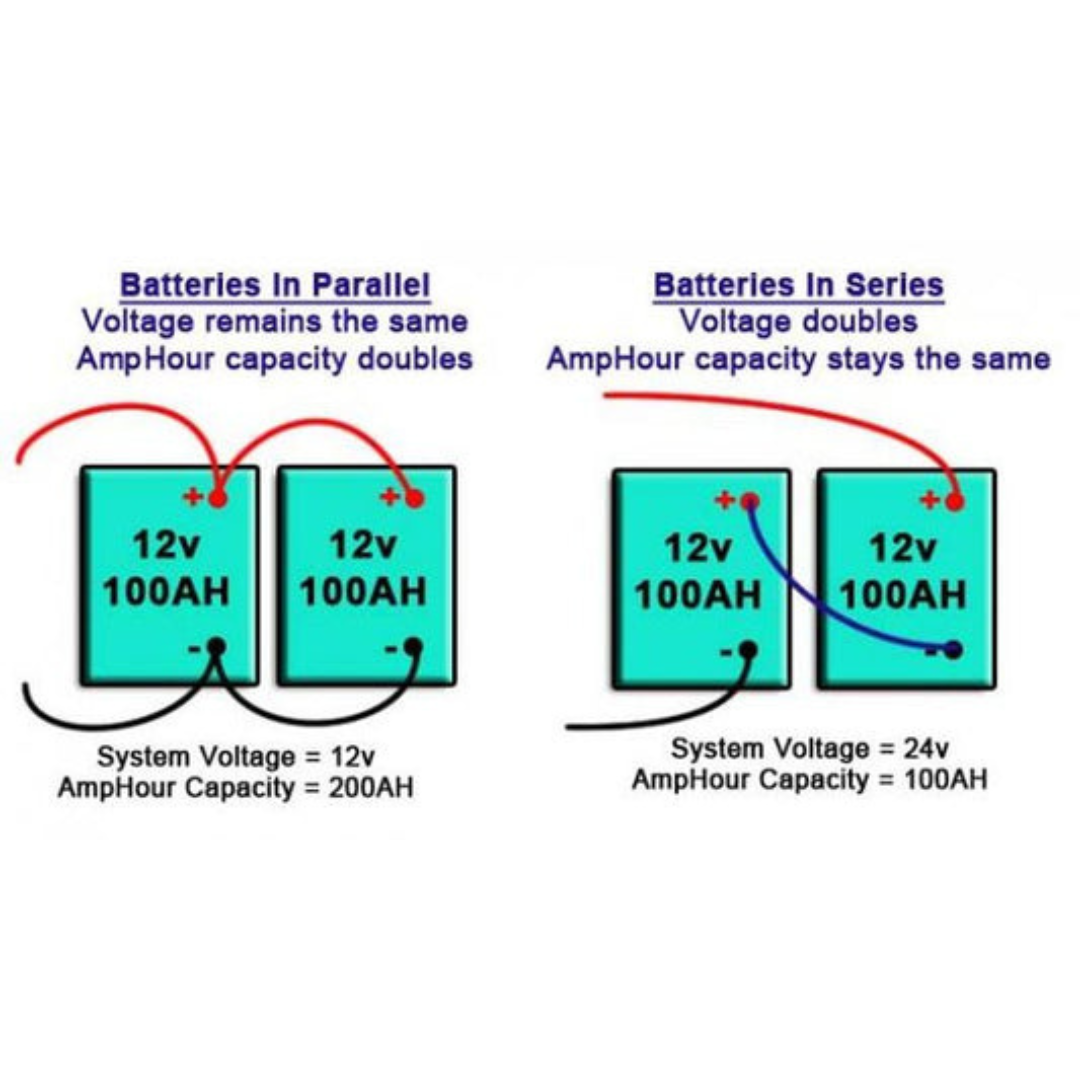
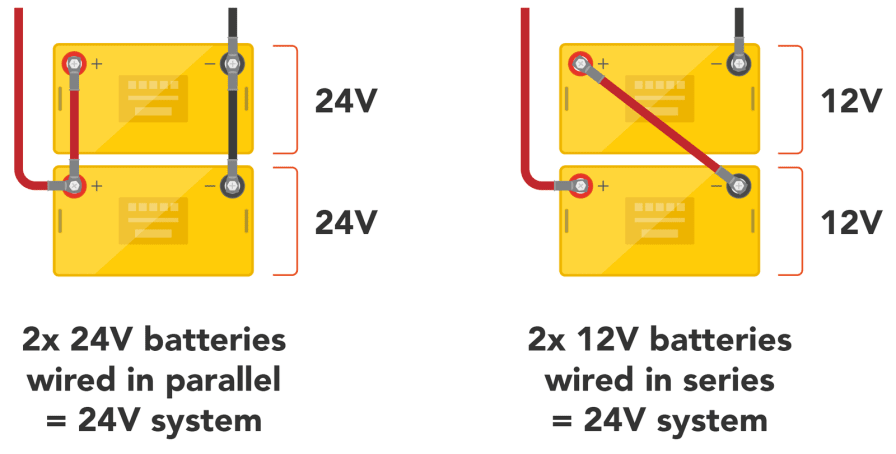
Battery Configurations: Series vs Parallel (With Real Examples)
How you connect batteries changes system voltage and capacity. Series boosts voltage. Parallel boosts capacity. Get this right and you’ll have smooth starts and happy electronics.
Series: Two 12V batteries to make 24V
Connect the positive of Battery A to the negative of Battery B. The free negative of A and free positive of B are your 24V outputs. Voltage adds; capacity (Ah) stays the same.
- Use identical batteries from the same batch when possible.
- Replace both batteries together to avoid imbalance.
- Do not draw 12V from one battery in the series. That unbalances them.
Parallel: Two 12V batteries to make 12V with more capacity
Connect positives together and negatives together. Voltage stays 12V; capacity (Ah) adds up. Great for RV house banks, boats, or audio builds.
- Fuse each battery lead to the bus bar for safety.
- Use equal-length cables to balance current flow.
- Charge with a smart charger rated for the full bank size.
Real example
A 12V truck with a big winch far from the battery may struggle on long wire runs. Options: upgrade to thicker cable, move the battery closer, or consider a 24V winch with a 24V auxiliary bank and a DC-DC step-down for the truck’s 12V electronics.
Cold Weather Starting: 12V vs 24V in Winter
Cold slows chemistry in lead-acid batteries and thickens oil. That means less battery power and more work for the starter. 24V systems help by cutting current and reducing cable losses. But any system can win winter with the right plan.
- Check CCA (Cold Cranking Amps): Higher CCA means better cold starts.
- Keep battery terminals clean and tight. Corrosion steals voltage.
- Use a battery blanket or engine block heater in harsh climates.
- Charge fully before a cold snap. A full battery resists freezing better.
- Avoid short trips. They don’t recharge after cold starts.
For safety reminders on winter prep and roadside hazards, see guidance shared by the National Highway Traffic Safety Administration.
Charging and Maintainers: What to Use for 12V and 24V
Charge with a smart charger that matches your system voltage and battery type. The right charger prevents overcharge, extends life, and keeps starts reliable.
Picking the right charger
Match specs and let the charger do the smart work. You’ll protect your battery and avoid headaches.
- Voltage: 12V chargers for 12V systems; 24V chargers for 24V systems.
- Chemistry: Flooded, AGM, Gel, or Lithium (LiFePO4). Chargers must match.
- Amps: Higher amps charge faster; 10–20% of battery Ah is a good rule.
- Features: Temperature compensation and maintenance mode help in garages with temp swings.
Safe charging steps
These basics prevent sparks and protect electronics. Always follow your charger’s manual too.
- Turn vehicle and accessories off.
- Connect charger positive to battery positive, then negative to chassis ground (or battery negative if the manual says so).
- Set chemistry and mode (AGM, etc.).
- Plug in and let it finish. Many chargers float automatically when full.
- Unplug, then remove clamps. Verify resting voltage after an hour.
Long-term storage? Use a maintainer rated for your voltage. It keeps the battery topped without overcharging. Consumer Reports has long noted that maintainers extend battery life by preventing deep discharges and sulfation.
Safety First: High-Voltage Habits for Low-Voltage Systems
12V and 24V sound low, but both can arc, burn, and damage electronics. A few habits go a long way to keep you safe and your gear healthy.
- Disconnect the negative cable before working on wiring.
- Fuse as close to the battery as possible for any added circuit.
- Never mix up positive and negative. Use red for +, black for –.
- Wear eye protection. Batteries can vent gas; avoid sparks.
- Secure batteries. Vibration kills plates and connections.
- Label jump points, especially on 24V fleets. Prevent costly mistakes.
Real-World Scenarios and Fixes
These quick stories mirror what many drivers face. Use the steps to fix your day and avoid repeat problems.
1) Sedan won’t start after leaving lights on (12V)
Your dash lights are weak. You hear fast clicking. Multimeter shows 11.8V. The battery is under 12V, so it’s discharged, not dead yet.
- Fix: Do a 12V-to-12V jump or use a jump pack. Idle the donor 2–3 minutes first.
- Test: After the jump, check running voltage (13.8–14.7V). If low, alternator may be failing.
- Prevent: Replace an old battery (4+ years) and check for parasitic drains like a glove box light.
2) Pickup cranks slow in Freezing Weather Safety: Best Ways to Stay Ready”>Freezing Weather and Your Car: What Every Owner Should Know”>freezing weather (12V)
Battery reads 12.2V after sitting. Oil is thick; starts are hard. This is a borderline state of charge.
- Fix: Warm the battery with a blanket or charge it indoors if possible. Use a maintainer overnight.
- Upgrade: Get a higher CCA battery and ensure clean terminals.
- Tip: Short trips in winter don’t recharge. Plan a longer drive weekly.
3) Box truck with 24V system keeps burning accessory fuses
A driver powered a 12V dash cam by tapping only one battery in a 24V pair. Now one battery fails early, and fuses keep popping.
- Fix: Install a 24V-to-12V DC-DC converter and wire the dash cam to it. Replace both series batteries as a matched pair.
- Prevent: Label “24V ONLY” near posts and add a small fused 12V accessory bus fed by the converter.
Direct Definitions: 12V vs 24V in Plain English
Need the shortest possible answers? Here they are. No fluff, just the facts that help you choose and fix problems fast.
- 12V system: Standard car voltage. Best universal support for accessories.
- 24V system: Heavy-duty vehicle voltage. Lower current and thinner cables for big loads.
- Mixing voltages: Don’t do it directly. Use a DC-DC converter.
- Jump-start rule: 12V to 12V only. 24V to 24V only.
- Testing rule: 12V healthy at rest is ~12.6–12.8V; 24V healthy is ~25.2–25.6V.
- Charging rule: 12V alternator ~14V; 24V alternator ~28V.
DIY Steps: Diagnose, Test, and Fix
Here’s a fast DIY playbook for beginners. Follow these steps in order to avoid confusion and bad guesses.
- Identify your system voltage:
- Most cars: 12V battery under the hood.
- Big trucks: Two 12V batteries in series for 24V.
- Look, listen, smell:
- Corrosion on terminals? Clean it.
- Loose cables or cracked insulation? Fix or replace.
- Burning smell? Stop and inspect for shorts.
- Test battery at rest:
- 12V: 12.6–12.8V is good; 12.2V is low; 12.0V is discharged.
- 24V: Double those numbers for a quick gut check.
- Test while running:
- 12V alternator: 13.8–14.7V.
- 24V alternator: 27.6–29.4V.
- Decide:
- Good battery, low charge: Recharge and re-test.
- Old battery, weak under load: Replace it.
- Low running voltage: Diagnose alternator/belt/fuses/wiring.
- Plan accessories:
- 12V car: Add gear with fused circuits and correct gauge.
- 24V truck: Use a DC-DC converter for 12V devices.
Troubleshooting Long Wire Runs and Voltage Drop
Long cables can starve devices. 24V helps, but 12V can still win with the right wire and layout. Small changes add up to big reliability gains.
- Use an online voltage drop calculator and pick the next thicker gauge.
- Shorten cable runs or move the battery/inverter closer to the load.
- Fuse near the battery and at distribution points.
- For 12V fridges/inverters far from the battery, consider a 24V system or heavier wire.
Upgrading from 12V to 24V (or Not): What to Know
Thinking about converting a 12V setup to 24V? It’s a big job. Sometimes it’s smarter to optimize 12V instead. Here’s a quick reality check.
- What changes: Starter, alternator, wiring, relays, fuses, and many modules. It’s not a drop-in swap.
- Better path for cars: Improve grounds, upgrade battery/alternator, use thicker cables, and shorten runs.
- For custom rigs: 24V makes sense when you have long heavy loads and can isolate or convert all accessories.
- Label everything post-upgrade to avoid 24V-to-12V jump mistakes.
Buying Batteries: AGM vs Flooded, Capacity, and CCA
Choosing the right battery matters more than picking 12V vs 24V. Use the right chemistry and specs for how you drive and where you live.
- AGM: Handles vibration, charges faster, less spill risk. Great for start-stop and accessories.
- Flooded: Cheaper, solid daily use, needs venting and maintenance.
- CCA: Crucial in cold climates. Higher CCA cranks better in winter.
- Reserve Capacity (RC): How long it powers loads with the engine off.
- Match group size: Use your owner’s manual or battery finder.
For trustworthy test results and buying advice, check independent reviews from Consumer Reports. They regularly rate batteries on performance and longevity in real-world conditions.
Accessory Planning: Inverters, Winches, Lights, and Audio
Big accessories need careful planning. Size wire and fuses right, pick quality parts, and your system will run strong for years.
- Inverters: High-watt inverters on 12V draw huge current. Consider 24V for long runs or over 1500W.
- Winches: Short, thick cables are critical. Higher voltage reduces current and heat.
- LED lighting: Low draw, long life. Add relays and fuses to avoid switch burnout.
- Audio: Big amps need big wires. Shortest runs, clean grounds, and proper fusing.
Maintenance Schedule: Keep 12V and 24V Systems Healthy
Simple maintenance prevents most breakdowns. Put these checks on your seasonal to-do list and avoid surprises.
- Every oil change: Inspect terminals, cable jackets, and grounds.
- Twice a year: Check resting voltage and clean corrosion.
- Before winter: Load-test battery and check CCA.
- For 24V: Verify both batteries in series read close to each other.
- Anytime you add gear: Recalculate fuse sizes and cable gauge.
Cost and Availability: What to Expect
12V parts are everywhere and usually cheaper. 24V gear can cost more and may require ordering. Plan spare parts if you run a 24V fleet or travel far from big cities.
- 12V batteries: Many brands at big-box stores, auto parts chains, and gas stations.
- 24V batteries: Often a pair of 12V in series. Keep them matched.
- Converters and chargers: Buy quality; cheap units create noise and failures.
Glossary: Plain-English Terms You’ll See
If a term feels fuzzy, check here. Clear terms help you make smart choices at the counter or online.
- Voltage (V): Electrical pressure. 12V or 24V for most vehicles.
- Current (A): Flow of electrons. Lower current is easier on cables.
- Power (W): Volts × Amps. Same power can be 12V high amps or 24V low amps.
- CCA: Cold cranking amps. Starting power in cold temps.
- SOC: State of charge. How full your battery is.
- DC-DC converter: Electronics that change one DC voltage to another.
- Series: Batteries connected to add voltage.
- Parallel: Batteries connected to add capacity (Ah).
FAQ: 12V vs 24V, Simple Answers
- Can I jump-start a 12V car with a 24V truck? No. You can destroy electronics. Only jump 12V to 12V. Use a DC-DC jump solution or a dedicated 12V source.
- Is 24V better than 12V? It depends. 24V cuts current and cable size, great for heavy loads and fleets. 12V wins for everyday cars and universal accessories.
- Why do some trucks have two batteries? Many use two 12V batteries in series to make 24V for reliable starting and reduced cable losses.
- What voltage should my battery show when the engine is running? About 13.8–14.7V on 12V systems. About 27.6–29.4V on 24V systems.
- Can I run 12V accessories on a 24V system? Yes, with a 24V-to-12V DC-DC converter. Don’t tap just one battery in a 24V pair.
- How long do car batteries last? Often 3–5 years, depending on climate, use, and maintenance. Heat and deep discharges shorten life.
- Why does my car click but not start? Usually a low battery or bad connection. Clean terminals, test voltage, and try a proper jump-start.
Conclusion
Here’s the bottom line. 12V is perfect for everyday cars because it’s simple and universal. 24V shines in heavy-duty vehicles by cutting current and cable losses. Never mix voltages when jump-starting. Test with a multimeter: around 12.6–12.8V for a healthy 12V battery and 25.2–25.6V for 24V systems. Use DC-DC converters if you blend accessories across systems, and always fuse near the battery. With these steps, you’ll solve no-starts faster, wire upgrades the right way, and keep your vehicle reliable in any season.

