Connecting car stereo wires doesn’t have to be intimidating. This guide walks you through identifying wire colors, using the right tools, and safely installing your new stereo—no experience needed. Get professional results in under an hour.
Key Takeaways
- Know your wire colors: Most car stereos use standard color codes (e.g., red for ignition, yellow for constant power, black for ground).
- Use a wiring harness adapter: This avoids cutting factory wires and makes installation reversible and safer.
- Test before finalizing: Always check connections with a multimeter or by powering on the stereo before reassembling the dashboard.
- Secure all connections: Use crimp connectors or solder and heat shrink tubing to prevent loose or shorted wires.
- Follow polarity carefully: Reversing speaker wires can cause poor sound quality or damage your stereo.
- Refer to your vehicle manual: Some cars have unique wiring setups or require special tools for dash removal.
- Take your time: Rushing increases the risk of mistakes—patience ensures a clean, safe install.
How to Connect Car Stereo Wires Like a Pro
Upgrading your car stereo can dramatically improve your driving experience—crisp sound, Bluetooth connectivity, smartphone integration, and more. But the thought of connecting car stereo wires often stops people in their tracks. Don’t worry! With the right tools, a little patience, and this step-by-step guide, you can connect car stereo wires like a pro—even if you’ve never opened your car’s dashboard before.
In this guide, you’ll learn how to safely remove your old stereo, identify each wire’s purpose using standard color codes, connect everything using a wiring harness adapter, and test your setup before putting everything back together. Whether you’re installing a basic single-DIN unit or a fancy double-DIN touchscreen, these steps apply to most vehicles made in the last 20 years.
Let’s get started!
Tools and Materials You’ll Need
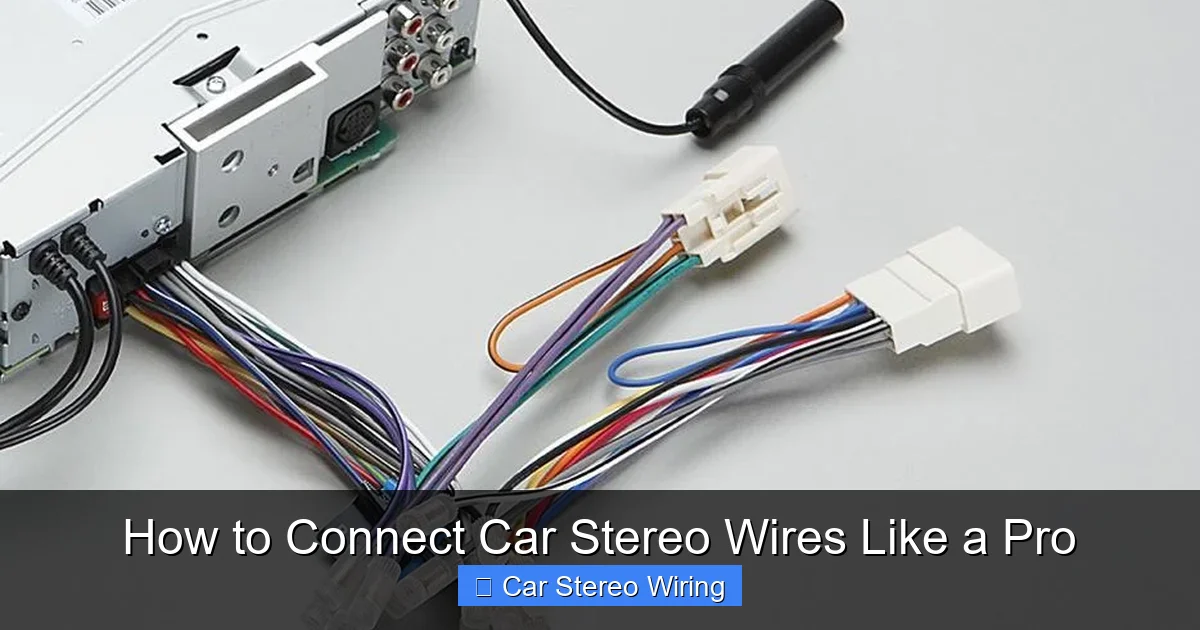
Visual guide about How to Connect Car Stereo Wires Like a Pro
Image source: stereoauthority.com
Before you begin, gather these essential tools and supplies. Having everything ready will save time and reduce frustration.
- New car stereo (single or double DIN)
- Vehicle-specific wiring harness adapter
- Dash removal tools (plastic pry tools or trim removal kit)
- Wire strippers
- Crimping tool and crimp connectors (butt connectors, spade terminals)
- Electrical tape or heat shrink tubing
- Screwdrivers (Phillips and flathead)
- Multimeter (optional but recommended)
- Zip ties or wire loom (for cable management)
Pro Tip: Buy a wiring harness adapter that matches your car’s make, model, and year. These plug directly into your factory harness, so you don’t have to cut any original wires. You can find them online or at auto parts stores.
Step 1: Disconnect the Car Battery
Safety first! Always disconnect the negative terminal of your car battery before working on any electrical components. This prevents accidental shorts, blown fuses, or damage to your new stereo.
How to Disconnect the Battery
- Open the hood and locate the battery.
- Use a wrench to loosen the nut on the negative terminal (marked with a “-” or black cable).
- Lift the cable off the terminal and secure it away from the battery with a zip tie or tape.
Note: Some stereos store settings in memory. Disconnecting the battery may reset these, so have your radio code ready if your car requires one.
Step 2: Remove the Old Stereo
Every car is a little different, but most stereos are held in place by screws or clips behind the dash panel.
Using Trim Removal Tools
- Start at the bottom or sides of the stereo bezel and gently pry it off using plastic trim tools. Avoid metal tools—they can scratch or crack the dashboard.
- Once the bezel is off, look for screws holding the stereo in place. Remove them with a screwdriver.
- Some stereos slide out easily; others may have release clips. Gently pull the stereo forward and disconnect the antenna and wiring harness from the back.
Pro Tip: Take a photo of the back of your old stereo before disconnecting anything. This helps you remember where each plug goes if you ever reinstall the original unit.
Step 3: Identify the Wiring Harness
Now that the old stereo is out, you’ll see a factory wiring harness plugged into the back. This is where your new stereo will connect—but not directly. You’ll use a wiring harness adapter to bridge the two.
Understanding Wire Colors
Most car stereos follow a standard color code. Here’s a quick reference:
- Yellow: Constant 12V+ (battery power—keeps memory alive)
- Red: Switched 12V+ (ignition power—turns stereo on/off with key)
- Black: Ground (connects to chassis)
- Orange: Illumination (dashboard lights)
- Blue/White: Remote turn-on (for amplifiers or powered antennas)
- White: Front left speaker (+)
- White/Black: Front left speaker (-)
- Gray: Front right speaker (+)
- Gray/Black: Front right speaker (-)
- Green: Rear left speaker (+)
- Green/Black: Rear left speaker (-)
- Purple: Rear right speaker (+)
- Purple/Black: Rear right speaker (-)
Important: These colors are standard, but some manufacturers (like Honda or BMW) may vary. Always double-check with your vehicle’s wiring diagram if available.
Step 4: Connect the Wiring Harness Adapter
This is the heart of the process. The wiring harness adapter has two ends: one that plugs into your car’s factory harness, and another with loose wires that match your new stereo’s color code.
Matching the Wires
- Take the adapter’s loose wires and match them to the corresponding wires on your new stereo’s harness. For example, connect yellow to yellow, red to red, etc.
- Strip about 1/2 inch of insulation from each wire using wire strippers.
- Twist the exposed copper strands to keep them neat.
Securing the Connections
You have two main options: crimping or soldering.
- Crimping: Use butt connectors or spade terminals. Insert both wires into the connector and squeeze with a crimping tool. This is fast and effective for most DIYers.
- Soldering: For a more permanent and reliable connection, twist the wires together and apply solder. Then cover with heat shrink tubing and use a heat gun to seal.
Pro Tip: Use different colored heat shrink tubing to label connections (e.g., red for power, green for speakers). This makes troubleshooting easier later.
Special Connections
Some wires need extra attention:
- Remote turn-on (blue/white): Connects to powered antennas or amplifiers. If you’re not using an amp, you can cap this wire with a wire nut.
- Illumination (orange): Controls dimming with your dashboard lights. If your stereo has a built-in dimmer, you may not need this wire.
- Ground (black): Must have a solid connection to the car’s metal chassis. Sand the paint off the mounting point if needed for better contact.
Step 5: Test the Connections
Before you button everything up, test your work.
Reconnect the Battery Temporarily
- Reconnect the negative battery terminal.
- Turn on the ignition (don’t start the engine).
- Power on the stereo and check:
- Does it turn on?
- Do all speakers play sound?
- Does the volume adjust smoothly?
- Do features like Bluetooth or USB work?
Warning: If nothing happens, turn off the stereo and recheck your connections. A reversed power wire or loose ground can prevent operation.
Using a Multimeter (Optional)
If you have a multimeter, test for voltage:
- Set to DC voltage (20V range).
- Touch the red probe to the yellow (constant) wire and black probe to ground. You should see ~12V.
- Repeat with the red (switched) wire—voltage should appear when the key is in “ACC” or “ON.”
Step 6: Mount the New Stereo
Once everything works, it’s time to install the stereo.
Secure the Stereo in the Dash
- Slide the new stereo into the dash opening.
- Use the mounting brackets or screws provided with your stereo or harness kit.
- Make sure it sits flush and doesn’t rattle.
Manage the Wires
- Bundled excess wires behind the stereo using zip ties.
- Keep wires away from moving parts (like steering columns or pedals).
- Use wire loom for a clean, professional look.
Reattach the Dash Panel
Snap the bezel or trim panel back into place. Make sure all clips are secure and there are no gaps.
Troubleshooting Common Issues
Even pros run into problems. Here’s how to fix the most common issues:
No Power to the Stereo
- Check fuses in the car’s fuse box (usually labeled “radio” or “audio”).
- Verify the red and yellow wires are connected correctly.
- Ensure the ground wire has a solid metal-to-metal connection.
Speakers Not Working
- Double-check speaker wire connections—polarity matters!
- Test each speaker individually by swapping wires.
- Make sure the stereo’s speaker settings (like balance/fade) aren’t muted.
Battery Drains Overnight
- The yellow (constant) wire is always live. If your stereo has a high standby draw, consider installing a switch or using a memory saver.
Static or Poor Sound Quality
- Loose or frayed wires can cause interference.
- Ensure all connections are tight and insulated.
- Keep power wires away from speaker wires to reduce noise.
Final Tips for a Pro Finish
- Label your wires: Use tape or tags to mark connections for future upgrades.
- Use quality tools: Cheap crimpers can fail—invest in a good set.
- Watch online videos: Search for your car model + “stereo install” for visual help.
- Take breaks: If you’re stuck, step away and return with fresh eyes.
Conclusion
Connecting car stereo wires might seem complex, but with the right approach, it’s totally doable. By using a wiring harness adapter, following standard color codes, and testing your work, you can upgrade your car’s audio system safely and effectively. Not only will you save money on professional installation, but you’ll also gain confidence in handling future car electronics projects.
Remember: patience and preparation are key. Take your time, double-check every connection, and don’t skip the battery disconnect. Before you know it, you’ll be cruising with crystal-clear sound and the satisfaction of a job well done.
Now go enjoy that new stereo—you earned it!
🎥 Related Video: car sterio wiring diagram #sony #music#xplod #youtube #android #speaker #cars #Dolby #wiring
📺 Kunal Auto

