Struggling with a glitchy or silent car stereo? This guide shows you how to fix car stereo wiring quickly and safely, even if you’re a beginner. Get your music back on track with simple tools and expert tips.
How to Fix Car Stereo Wiring Like a Pro in Minutes
Is your car stereo acting up? Maybe it won’t turn on, the sound cuts in and out, or one speaker isn’t working. Before you panic or spend money at a shop, know this: most car stereo issues come down to wiring problems. The good news? You can fix car stereo wiring yourself—quickly and safely—with just a few tools and some patience.
In this guide, you’ll learn how to diagnose and repair common wiring issues step by step. Whether you’re dealing with a loose connection, a blown fuse, or mismatched wires, we’ll walk you through the process like a pro. No electrical degree required. Just follow along, stay safe, and get your tunes back in minutes.
What You’ll Need
Before you start, gather these tools and supplies. Having everything ready saves time and frustration.
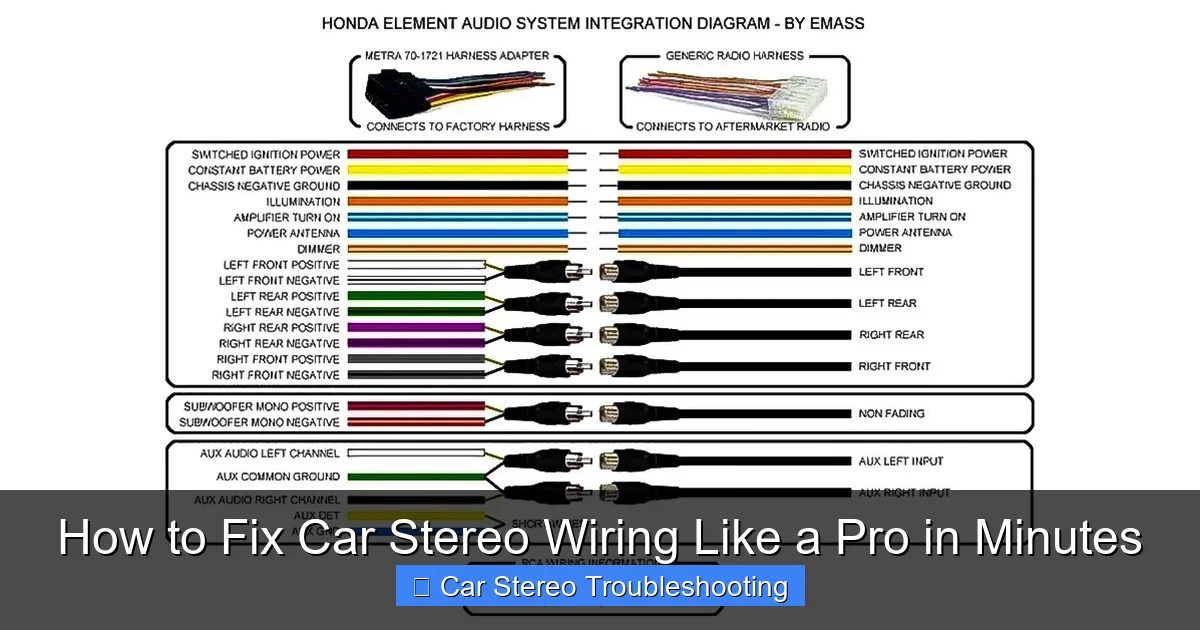
Visual guide about How to Fix Car Stereo Wiring Like a Pro in Minutes
Image source: caraudioradar.com
- Wire strippers
- Electrical tape or heat shrink tubing
- Multimeter (to test voltage and continuity)
- Crimping tool and connectors (butt connectors, spade terminals)
- Replacement fuse (if needed)
- Wiring diagram for your car and stereo (check the manual or online)
- Screwdrivers (Phillips and flathead)
- Gloves and safety glasses
Pro tip: Take a photo of the current wiring setup before disconnecting anything. It’s a lifesaver if you get confused later.
Step 1: Disconnect the Battery
Safety is non-negotiable. Working on car electronics with the battery connected can cause short circuits, damage your stereo, or even start a fire.
How to disconnect safely:
- Turn off the ignition and remove the key.
- Open the hood and locate the battery.
- Use a wrench to loosen the negative (-) terminal first (usually black).
- Remove the cable and tuck it away so it doesn’t touch the terminal.
Why the negative first? It reduces the risk of sparking near the positive terminal, which could ignite hydrogen gas from the battery.
Step 2: Remove the Stereo Unit
Most car stereos are held in place by screws or a trim panel. Here’s how to get it out without damaging your dashboard.
For standard DIN-sized stereos:
- Use a trim removal tool or a flathead screwdriver (wrapped in tape to prevent scratches) to gently pry off the faceplate.
- Look for release tabs on the sides of the stereo. Insert removal keys (often included with the stereo) or bent coat hangers to unlock them.
- Slide the stereo out carefully.
For double-DIN or factory stereos:
- Remove screws from the dashboard or center console.
- Detach any climate control or trim panels blocking access.
- Pull the stereo forward and disconnect the antenna and wiring harness.
Note: Some newer cars have integrated systems. If you’re unsure, consult your vehicle’s manual or search online for your make and model.
Step 3: Inspect the Wiring Harness
Now that the stereo is out, take a close look at the wiring. Look for:
- Frayed or broken wires
- Corrosion or burn marks
- Loose or disconnected connectors
- Melted insulation
If you see damage, that’s likely your problem. But even if everything looks fine, don’t skip the next step—testing.
Check the fuse:
- Locate the fuse box (usually under the dashboard or in the engine bay).
- Find the fuse labeled “radio” or “audio.”
- Use a multimeter or visual inspection to see if it’s blown.
- Replace with an identical fuse if needed.
A blown fuse often means a short circuit somewhere in the wiring. Fix the root cause before replacing it, or it’ll blow again.
Step 4: Match and Connect the Wires
This is where many people go wrong. Car stereo wiring uses standard color codes, but they’re not always followed perfectly—especially in aftermarket installations.
Common wire colors and their functions:
- Yellow: Constant 12V power (memory)
- Red: Switched 12V power (ignition)
- Black: Ground
- White / White with black stripe: Front left speaker (+ / -)
- Gray / Gray with black stripe: Front right speaker (+ / -)
- Green / Green with black stripe: Rear left speaker (+ / -)
- Purple / Purple with black stripe: Rear right speaker (+ / -)
Important: Always double-check your stereo’s manual. Some brands (like Pioneer or Sony) may vary slightly.
How to connect properly:
- Strip about 1/2 inch of insulation from each wire.
- Twist the exposed strands to prevent fraying.
- Use butt connectors or solder the wires together for a secure connection.
- Cover each joint with electrical tape or heat shrink tubing.
Pro tip: Use a multimeter to test continuity between the stereo and harness. This confirms the wires are connected correctly.
Step 5: Secure the Ground Connection
A bad ground is one of the most overlooked causes of stereo failure. If your stereo powers on but sounds weak or cuts out, check the ground.
How to fix a poor ground:
- Locate the ground wire (usually black) from the stereo harness.
- Find a clean, unpainted metal spot on the car’s chassis near the stereo.
- Sand the area lightly to remove paint and rust.
- Attach the ground wire with a screw and washer.
- Tighten securely—don’t overtighten and strip the screw.
Never ground to plastic or painted metal. It won’t conduct electricity properly and can cause noise or failure.
Step 6: Test Before Reassembly
Before you put everything back, reconnect the battery and test the stereo.
Testing steps:
- Reconnect the negative battery terminal.
- Turn on the ignition (don’t start the engine yet).
- Power on the stereo.
- Check if it turns on and holds memory (like radio presets).
- Test all speakers—play music and adjust balance/fade.
- Listen for distortion, static, or no sound.
If everything works, great! If not, don’t panic. Move to the troubleshooting section below.
Troubleshooting Common Wiring Issues
Even with careful wiring, problems can happen. Here’s how to fix the most common ones.
Stereo won’t turn on:
- Check if the red (switched power) and yellow (constant power) wires are connected.
- Test voltage at the harness with a multimeter—should read 12V.
- Verify the fuse isn’t blown.
No sound from one speaker:
- Swap the speaker wires at the stereo to see if the problem follows the wire.
- Test the speaker with another audio source.
- Check for loose or reversed polarity connections.
Static or humming noise:
- Ensure the ground is solid and connected to bare metal.
- Keep audio wires away from power wires to avoid interference.
- Use shielded RCA cables if using an external amplifier.
Memory resets when car is off:
- The yellow (constant power) wire may be disconnected or faulty.
- Test for 12V with the ignition off.
Step 7: Reinstall the Stereo
Once everything is working, it’s time to put the stereo back.
Reinstallation tips:
- Reconnect the antenna and wiring harness.
- Slide the stereo back into the dash gently.
- Secure with screws or locking tabs.
- Reattach trim panels and screws.
- Double-check that no wires are pinched.
Final tip: Turn the stereo on one more time after reassembly to confirm everything still works.
When to Call a Professional
Most wiring issues are DIY-friendly, but sometimes it’s best to call in an expert. Consider professional help if:
- Your car has a complex factory audio system with amplifiers or navigation.
- You’re installing a new stereo and don’t have a wiring harness adapter.
- You suspect damage to the car’s electrical system.
- You’re not comfortable working with electricity.
It’s better to pay for expert help than risk damaging your car or stereo.
Conclusion
Fixing car stereo wiring doesn’t have to be scary or complicated. With the right tools, a clear plan, and attention to safety, you can solve most issues in under 30 minutes. Remember: always disconnect the battery, match wire colors correctly, and test before reassembling.
By following this guide, you’ll not only save money but also gain confidence in handling car electronics. So the next time your stereo acts up, you’ll know exactly what to do. Turn the key, press play, and enjoy the ride—your way.

