Connecting an OBD2 scanner is a simple yet essential skill for any vehicle owner or mechanic. This guide will show you how to connect an OBD2 scanner easily, helping you perform accurate diagnostics to identify and fix car issues quickly and effectively.
Quick Answers to Common Questions
Where exactly is the OBD2 port located?
Look under the dashboard on the driver’s side, near the steering column or footwell. Your vehicle manual also shows the exact location.
Can I connect the scanner while the engine is running?
It’s best to connect the scanner with the ignition in the “ON” position but the engine off, unless your scanner or vehicle instructions say otherwise.
What if the scanner doesn’t read any codes?
Check the connection, ensure compatibility, and verify the check engine light is on. Sometimes, no codes mean no detected problems.
How often should I scan my vehicle?
Scan your car whenever the check engine light comes on or during regular maintenance to catch issues early.
Is it safe to clear codes myself?
Only clear codes after fixing the issue to avoid hiding problems. Clearing codes resets the vehicle’s system and turns off warning lights.
How to Connect OBD2 Scanner Easily for Accurate Vehicle Diagnostics
If you own a car or work on vehicles, you’ve probably heard about OBD2 scanners. These handy devices can diagnose vehicle problems quickly by reading error codes from your car’s computer. In this guide, you will learn exactly how to connect an OBD2 scanner easily and use it to get accurate diagnostics. Whether you’re a beginner or have some experience, these steps and tips will help you get the most out of your scanner.
What is an OBD2 Scanner?
OBD2 stands for On-Board Diagnostics, second generation. It is a standardized system in most vehicles built after 1996 that monitors the health of your car’s engine and other key systems. An OBD2 scanner plugs into your vehicle’s port to read diagnostic trouble codes (DTCs), helping you identify issues like engine faults, emission problems, or sensor failures.
Visual guide about How to Connect OBD2 Scanner Easily for Accurate Vehicle Diagnostics
Image source: cdn.shopify.com
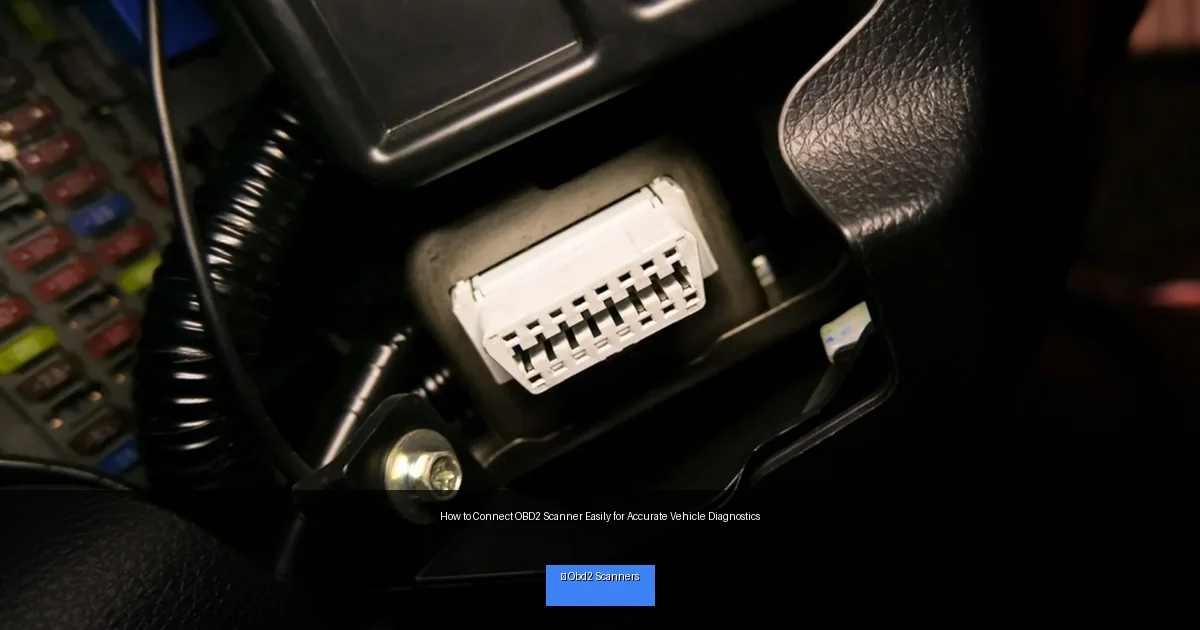
Step 1: Locate the OBD2 Port
The first step is finding the OBD2 port in your vehicle. This port is the connection point for the scanner.
Where to Look
- Common locations: Under the dashboard, near the steering column, or around the driver’s side footwell.
- Shape and size: The port is usually trapezoid-shaped and about 2 inches wide.
- Use your vehicle manual: If unsure, consult your car’s owner manual for exact port location.
Step 2: Prepare Your Vehicle
Before connecting the scanner, take these precautions:
- Turn off the engine: The ignition should be off or in the “ON” position without starting the engine.
- Engage parking brake: For safety, ensure the vehicle is parked securely.
- Check the battery: Make sure your vehicle battery has sufficient charge to prevent interruptions.
Step 3: Connect the OBD2 Scanner
Plugging in the Scanner
Take the OBD2 scanner connector and firmly insert it into the port. It should fit snugly without forcing it. Most connectors are designed to only fit one way.
Powering the Scanner
Once connected, turn the ignition key to the “ON” position without starting the engine. This powers the vehicle’s computer and the scanner.
Step 4: Turn On and Use the Scanner
Power on the Device
Most scanners will power on automatically when connected. If not, press the power or start button on the device.
Navigate the Menu
Use the scanner’s buttons or touchscreen to select “Read Codes” or similar options. This will fetch the diagnostic trouble codes stored in the vehicle’s system.
Interpreting Codes
The scanner will display codes like P0301, P0420, etc. Each code corresponds to a specific problem. Many scanners provide a brief description, or you can look up codes online or in the user manual.
Step 5: Clear Codes (Optional)
If you want to clear the codes after fixing the problem, use the “Clear Codes” function on your scanner. This resets the vehicle’s computer and turns off the check engine light. Only do this after repairs, as clearing codes without fixing issues can hide problems.
Practical Tips for Accurate Diagnostics
- Use a reliable scanner: Invest in a quality OBD2 scanner for accurate readings.
- Check scanner compatibility: Ensure your scanner supports your vehicle’s make and model.
- Perform tests on a warmed-up engine: Some codes appear only after the engine reaches normal operating temperature.
- Keep your vehicle’s manual handy: It helps understand specific system details.
Troubleshooting Common Connection Issues
Scanner Not Powering On
- Check if the ignition is in the correct “ON” position.
- Try a different vehicle port if available.
- Inspect the scanner’s fuse or battery if applicable.
No Communication with Vehicle
- Double-check the OBD2 connector is properly inserted.
- Verify scanner compatibility with your vehicle model.
- Restart the vehicle ignition and reconnect.
Error Codes Not Displaying
- Ensure the vehicle’s computer has stored codes (the check engine light should be on).
- Try reading pending or pending codes if available.
- Consult scanner manual for firmware updates or reset procedures.
Maintaining Your OBD2 Scanner
Keep your scanner clean, store it safely, and update the software or firmware regularly. Proper care ensures it lasts and remains accurate.
Conclusion
Connecting an OBD2 scanner is a straightforward process that empowers you to diagnose vehicle issues quickly and accurately. By following these simple steps and tips on how to connect an OBD2 scanner, you can save time and money on car repairs. Remember to handle your scanner and vehicle safely, and consult manuals or professionals if you encounter complex problems. Happy diagnosing!
🎥 Related Video: How to Use an OBD-II Scan Tool
📺 Car and Driver
With car computers doing so much heavy lifting these days, knowing how to use a hand-held scanning tool to communicate with it …

