How to Adjust Car Stereo Equalizer for Perfect Sound
This guide teaches you how to adjust your car stereo equalizer for the best possible sound. You’ll learn to balance bass, mids, and treble for a rich, clear audio experience tailored to your ears and vehicle.
Key Takeaways
- Understand EQ bands: Most car stereos have 3–10 EQ bands controlling bass, mids, and treble—knowing what each does is key to great sound.
- Start flat: Always begin with all EQ settings at zero (flat) so you can make balanced adjustments from a neutral baseline.
- Use familiar music: Tune your EQ using songs you know well—this helps you hear subtle changes and avoid over-adjusting.
- Adjust in small steps: Make minor changes (1–2 dB) at a time and listen carefully to avoid distortion or imbalance.
- Consider your car’s acoustics: Hard surfaces reflect sound; soft materials absorb it—adjust EQ to compensate for your car’s interior.
- Test at different volumes: Sound changes with volume—fine-tune your EQ at low, medium, and high levels for consistent quality.
- Save custom presets: Many stereos let you save EQ settings—use this to switch between music genres or driving conditions.
How to Adjust Car Stereo Equalizer for Perfect Sound
Ever turned up the volume in your car only to be disappointed by muddy bass, shrill highs, or weak vocals? You’re not alone. Most factory car stereos come with default equalizer (EQ) settings that aren’t optimized for your ears or your vehicle’s unique acoustics. The good news? You can fix that. Learning how to adjust your car stereo equalizer is one of the easiest ways to dramatically improve your in-car audio experience—no expensive gear required.
In this guide, we’ll walk you through a simple, step-by-step process to tune your car stereo’s equalizer for crisp, balanced, and immersive sound. Whether you’re a music lover, audiophile, or just want clearer talk radio, these tips will help you get the most out of your system. By the end, you’ll know exactly how to tweak bass, mids, and treble to match your preferences and your car’s environment.
What Is a Car Stereo Equalizer?
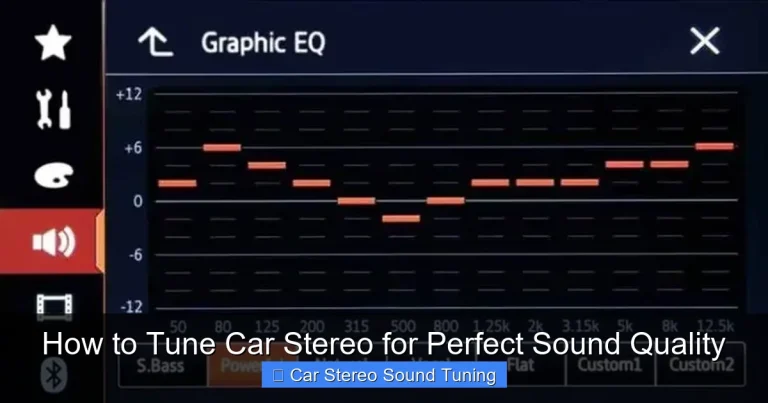
An equalizer (or EQ) is a tool that lets you adjust the volume of specific frequency ranges in your audio signal. Think of it like a sound mixer for your car stereo. It divides sound into bands—typically bass (low frequencies), mids (mid-range), and treble (high frequencies)—and lets you boost or cut each band independently.

Visual guide about How to Adjust Car Stereo Equalizer for Perfect Sound
Image source: improvecaraudio.com
For example, boosting the 60 Hz band adds more thump to your bass, while reducing the 10 kHz band can soften harsh cymbals. Most modern car stereos have either a 3-band (bass, mid, treble), 5-band, 7-band, or even 10-band graphic equalizer. Some advanced systems also offer parametric EQ, which gives you even more control over frequency, bandwidth, and gain.
Why does this matter? Because every car interior sounds different. A sedan with cloth seats absorbs sound differently than an SUV with leather and hard plastics. Plus, your personal taste in music plays a role. Jazz lovers might want clearer vocals, while hip-hop fans crave deep bass. The EQ helps you tailor the sound to your needs.
Step 1: Start with a Flat EQ
Before making any changes, reset your equalizer to a flat (neutral) setting. This means all EQ bands should be set to 0 dB (decibels)—no boosts, no cuts. Why? Because starting from a neutral point ensures you’re hearing the music as the artist intended, without artificial coloration.
How to Reset Your EQ
- Go to your stereo’s audio or sound settings menu.
- Look for “Equalizer,” “EQ,” or “Sound Settings.”
- Select “Flat,” “Normal,” or manually set each band to 0 dB.
- If your stereo has presets (like “Rock,” “Pop,” or “Jazz”), avoid them for now—they’re often exaggerated and not ideal for tuning.
Once your EQ is flat, play a song you know well—something with a mix of vocals, instruments, and bass. Listen carefully. Does it sound balanced? Or do certain elements feel too loud or too quiet? This is your baseline.
Step 2: Choose the Right Music for Tuning
Not all songs are created equal when it comes to EQ tuning. You want tracks that showcase a wide range of frequencies and are well-recorded. Avoid overly compressed or bass-heavy tracks that can mislead your adjustments.
Best Types of Music for EQ Tuning
- Acoustic or live recordings: These often have natural dynamics and clear vocals—great for hearing subtle EQ changes.
- Jazz or classical: Instruments like pianos, violins, and double basses cover a broad frequency range.
- Pop or rock with clean production: Look for songs with distinct vocals, guitar, bass, and drums.
Avoid dubstep, heavy metal with distorted guitars, or lo-fi tracks—they can make it hard to hear accurate frequency balance. Stick to 2–3 familiar songs and cycle through them as you adjust.
Step 3: Adjust the Bass (Low Frequencies)
Bass is the foundation of your sound, but too much can make music sound muddy, while too little leaves it thin. Most car stereos control bass in the 60–250 Hz range.
How to Tune the Bass
- Start by slightly boosting the lowest band (e.g., 60 Hz) by +2 dB.
- Listen for deeper, fuller bass—like the kick drum or bass guitar.
- If the bass sounds boomy or distorts at higher volumes, reduce it by 1–2 dB.
- If vocals or instruments sound weak, the bass might be overpowering—cut it slightly.
Pro Tip: If your car has a subwoofer, adjust its level separately from the main EQ. Use the stereo’s subwoofer control (usually in the audio menu) to blend it smoothly with the rest of the sound.
Remember: Bass travels differently in a car. Hard surfaces reflect it, making it louder in some spots. Sit in the driver’s seat (where you’ll be listening most) and tune from there.
Step 4: Fine-Tune the Midrange (Mid Frequencies)
The midrange (250 Hz to 4 kHz) is where most vocals and instruments live. Getting this right is crucial for clarity and presence. If mids are too low, music sounds distant; if too high, it can become harsh or fatiguing.
How to Adjust the Mids
- Focus on the 500 Hz to 2 kHz range—this is where vocals shine.
- Boost slightly (+1 to +3 dB) if vocals sound buried or instruments lack definition.
- Cut (-1 to -2 dB) if the sound feels “boxy” or overly nasal.
- For a warmer sound, gently boost around 200–400 Hz.
- For more clarity, try a small boost at 2–3 kHz.
Example: If your favorite singer’s voice sounds muffled, a small boost at 1.5 kHz can bring it forward. But be careful—too much can make cymbals or sibilance (“s” sounds) sharp.
Step 5: Dial in the Treble (High Frequencies)
Treble (4 kHz and above) adds sparkle, air, and detail to your music. It’s responsible for the crispness of cymbals, the clarity of high notes, and the sense of space. But too much treble can cause ear fatigue, especially on long drives.
How to Set the Treble
- Start with a small boost (+1 to +2 dB) at 8–10 kHz for added brightness.
- If the sound feels harsh or piercing, reduce the highest bands (10–12 kHz).
- For a smoother, more relaxed sound, cut slightly at 6–8 kHz.
- Avoid boosting treble too much—it can make music sound artificial.
Tip: If you wear glasses or have sensitive ears, you might prefer slightly reduced treble. Everyone’s hearing is different—trust your ears, not the numbers.
Step 6: Test at Different Volume Levels
Sound behaves differently at low, medium, and high volumes. What sounds great at 20 volume might distort at 40. This is due to how our ears perceive frequencies at different loudness levels (a concept called the Fletcher-Munson curve).
How to Test Across Volumes
- Play your test track at low volume (10–15). Listen for clarity in vocals and instruments.
- Increase to medium (25–30). Check if bass remains tight and treble isn’t shrill.
- Turn it up high (35–40). Ensure there’s no distortion, especially in the bass.
- Make small EQ adjustments if needed to maintain balance across levels.
If your stereo has a “Loudness” feature, turn it off while tuning. It artificially boosts bass and treble at low volumes and can mislead your EQ decisions.
Step 7: Save Your Custom EQ Preset
Once you’re happy with your settings, save them! Most modern car stereos allow you to create and name custom EQ presets.
How to Save Your EQ
- Go to the EQ menu and look for “Save,” “User,” or “Custom.”
- Name your preset (e.g., “My Daily Drive” or “Bass Boost”).
- Some systems let you save multiple presets—great for different music genres or passengers.
Having custom presets means you can switch between settings instantly. For example, use a bass-heavy preset for hip-hop and a balanced one for podcasts.
Troubleshooting Common EQ Problems
Even with careful tuning, you might run into issues. Here’s how to fix common problems:
Problem: Sound is distorted at high volume
This usually means you’ve boosted a frequency too much, especially in the bass. Reduce the lowest EQ bands by 2–3 dB and check your amplifier gain settings if you have an aftermarket system.
Problem: Vocals sound distant or weak
Your mids might be too low. Try a small boost (1–2 dB) around 1–2 kHz. Also, check if your stereo has a “Vocal” or “Presence” setting—enable it for clearer speech.
Problem: Music sounds “tinny” or harsh
You’ve likely overdone the treble. Cut the highest bands (10–12 kHz) by 1–2 dB. Also, reduce any excessive boosts in the upper mids (3–5 kHz).
Problem: Bass is weak even after boosting
Your car’s speakers or subwoofer might not be capable of deep bass. Consider upgrading to better speakers or adding a subwoofer. Also, check if your stereo’s bass boost feature is enabled.
Final Tips for Perfect Car Sound
- Keep it simple: You don’t need extreme EQ settings. Small, thoughtful adjustments make the biggest difference.
- Listen with intention: Don’t just turn knobs randomly. Focus on one band at a time and listen for changes.
- Re-tune periodically: Your ears adapt over time. Reassess your EQ every few months or after changing speakers.
- Use high-quality audio files: Streaming at low bitrates (like 128 kbps) limits sound quality. Use 320 kbps MP3s or lossless formats when possible.
- Consider acoustic treatment: Adding sound-deadening material to doors can reduce vibrations and improve clarity.
Conclusion
Adjusting your car stereo equalizer isn’t just for audiophiles—it’s for anyone who wants better sound on the road. By starting flat, using familiar music, and making small, intentional changes, you can transform your daily commute into a concert-like experience. Remember, the goal isn’t to max out every band, but to create a balanced, enjoyable sound that suits your ears and your car.
So grab your favorite playlist, sit in the driver’s seat, and start tuning. With a little patience and practice, you’ll master how to adjust your car stereo equalizer and enjoy every mile with perfect sound.
🎥 Related Video: Tuning your car stereo – Head Unit Equalizer – No DSP! PROCESS EXPLAINED
📺 CarAudioFabrication
Many aftermarket head units now have an “EQ” or equalizer built in. What is the equalizer for and how do we tune and set it on our …