How to Put Car Seat Cover After Washing Quickly and Easily
Putting your car seat cover back on after washing doesn’t have to be frustrating. This guide walks you through a simple, stress-free process to reinstall your cover correctly, ensuring a snug fit and long-lasting protection for your vehicle’s interior.
Key Takeaways
- Always air-dry seat covers completely before reinstalling to prevent mold, odors, and fabric damage.
- Start with the headrest and work your way down for easier alignment and fewer wrinkles.
- Use the original straps and hooks to secure the cover tightly and avoid slipping during drives.
- Smooth out fabric as you go to eliminate bunching and ensure a professional, clean look.
- Check for hidden clips or zippers that may need reconnecting after washing.
- Test the seatbelt and airbag functionality after installation to ensure safety compliance.
- Regular maintenance extends cover life—wash every 1–2 months depending on use.
How to Put Car Seat Cover After Washing Quickly and Easily
So, you’ve just finished washing your car seat covers—great job! Now comes the part that often feels like a puzzle: putting them back on. Whether you’re dealing with universal-fit covers or custom designs, reinstalling them doesn’t have to be a headache. With the right approach, you can have your seats looking fresh, clean, and protected in under 15 minutes.
In this guide, we’ll walk you through a simple, step-by-step process to put your car seat cover back on after washing. You’ll learn how to avoid common mistakes, ensure a snug fit, and keep your car’s interior looking sharp. Whether you’re a busy parent, a rideshare driver, or just someone who loves a clean car, this method will save you time and frustration.
Let’s get started!
Step 1: Let the Covers Dry Completely
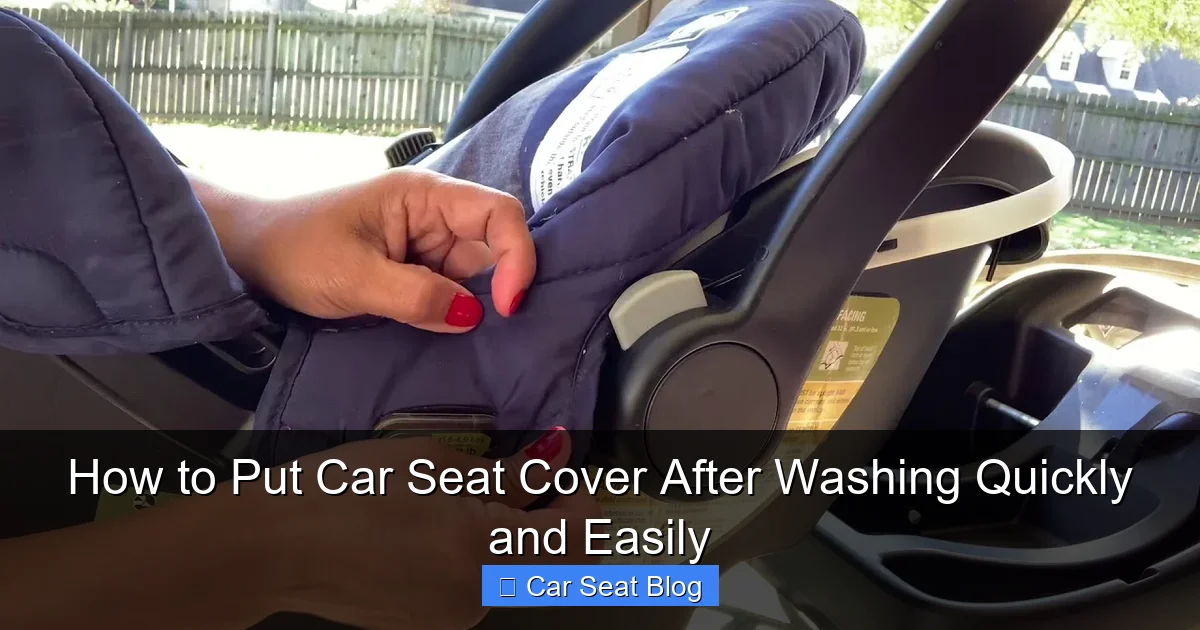
Visual guide about How to Put Car Seat Cover After Washing Quickly and Easily
Image source: i.ytimg.com
Before you even think about reinstalling your seat covers, make sure they’re 100% dry. This is one of the most important—and often overlooked—steps.
Why Drying Matters
Wet or damp seat covers can trap moisture between the fabric and your car seat. Over time, this leads to mold, mildew, and unpleasant odors. Plus, damp fabric is heavier and harder to stretch, making installation more difficult.
How to Dry Properly
After washing, gently squeeze out excess water—don’t wring, as this can damage the fibers. Lay the covers flat on a clean, dry surface or hang them over a clothesline or shower rod. Avoid direct sunlight, which can fade colors and weaken fabric over time.
If you’re in a hurry, use a fan to speed up air circulation. Never use a dryer unless the manufacturer specifically allows it. Most car seat covers are made from delicate materials like polyester, neoprene, or mesh, which can shrink or melt in high heat.
Pro Tip: Touch-test the fabric before reinstalling. If it feels cool or damp, give it more time to dry.
Step 2: Gather Your Tools and Supplies
You don’t need much to reinstall seat covers, but having the right tools on hand makes the process smoother.
What You’ll Need
- Clean, dry seat covers
- Original installation straps, hooks, or clips (check your car’s manual or the cover packaging)
- A clean microfiber cloth (to wipe down the seat if needed)
- A small flashlight (to see under the seat or in tight spaces)
- Patience and a positive attitude!
If you’ve lost any straps or clips, check with the manufacturer or look for universal replacements online. Some covers come with Velcro, elastic bands, or buckles—know what yours uses before starting.
Step 3: Prepare the Car Seat
Before slipping the cover back on, take a moment to clean the actual seat.
Wipe Down the Seat
Use a dry or slightly damp microfiber cloth to remove dust, crumbs, or pet hair from the seat surface. This prevents dirt from getting trapped under the new cover and keeps your interior looking fresh.
Check for Obstructions
Make sure nothing is stuck under the seat—like loose change, toys, or wrappers. Also, ensure the seat is in its default position (not reclined or moved forward) so the cover fits properly.
Locate Anchor Points
Most seat covers attach using hooks, straps, or clips that connect to the seat frame. Familiarize yourself with where these points are. Common locations include:
– Under the seat cushion
– Behind the headrest posts
– Along the sides of the seat base
Use your flashlight if needed to spot hidden hooks or loops.
Step 4: Start with the Headrest
The headrest is usually the easiest place to begin. It’s also a great anchor point that helps align the rest of the cover.
Remove the Headrest (If Possible)
Many car seats allow you to remove the headrest by pressing a button or lever on the side. If yours does, take it out now. This makes slipping the cover over the top much easier.
If your headrest is fixed, don’t worry—just work the cover over it carefully.
Slide the Cover Over the Headrest
Find the headrest opening in the seat cover (it’s usually clearly marked). Gently pull the fabric over the headrest posts. If it’s tight, wiggle it slightly or use your hands to stretch the material just enough to fit.
Pro Tip: Turn the cover inside out slightly as you slide it on—this reduces friction and prevents tearing.
Reattach the Headrest
Once the cover is in place, reinsert the headrest into the seat. Make sure it clicks securely into position. The cover should sit flat around the base of the headrest with no bunching.
Step 5: Work Your Way Down the Seat
Now that the top is secure, it’s time to tackle the seat back and cushion.
Align the Cover with the Seat Back
Drape the cover over the seat back, making sure the front side (the side that faces you when driving) is outward. Smooth out any large wrinkles with your hands.
Secure the Top Straps
Look for straps or elastic bands at the top of the cover. These usually hook under the seat or behind the headrest posts. Attach them tightly to prevent the cover from sliding down.
Tuck the Sides In
Most seat covers have side flaps or elastic edges designed to tuck into the crevices between the seat back and the car door. Use your fingers or a flat tool (like a butter knife or plastic spatula) to gently push the fabric into these gaps.
This not only gives a cleaner look but also keeps the cover from shifting during use.
Move to the Seat Cushion
Now focus on the bottom part of the seat. Pull the cover down over the cushion, starting from the front and working toward the back.
Attach Bottom Straps
Many covers have hooks or loops that connect under the seat. Reach underneath and fasten these securely. If your cover uses Velcro, press the strips together firmly.
Pro Tip: Have a friend help you hold the cover taut while you fasten the straps—this ensures a snug fit.
Step 6: Smooth Out Wrinkles and Bunching
Even with careful installation, wrinkles can appear. Don’t stress—this is normal and fixable.
Use Your Hands to Smooth
Run your hands over the entire surface of the cover, from top to bottom. Focus on areas that look loose or bunched, like the sides or center of the seat.
Adjust Straps if Needed
If the cover still looks loose, double-check the straps. Tighten any that aren’t fully secured. Avoid over-tightening, though—this can cause fabric tearing.
Check for Twists
Make sure the cover isn’t twisted along the sides. A twisted cover can rub against your legs or look uneven. Untwist it by gently pulling and repositioning the fabric.
Step 7: Test Functionality and Safety
This step is crucial—especially if your seat has airbags or seatbelt mechanisms.
Test the Seatbelt
Pull the seatbelt out and retract it to ensure it moves freely. The cover shouldn’t interfere with the belt’s path or locking mechanism.
Check Airbag Compatibility
If your seat has side airbags, make sure the cover isn’t blocking the seams where the airbag deploys. Most modern covers are designed with tear lines or open sides for this purpose, but it’s worth verifying.
Never install a cover that obstructs airbag deployment—it could be dangerous in an accident.
Sit in the Seat
Finally, sit in the seat and move around a bit. Does the cover feel secure? Does it slip or pinch? Make minor adjustments if needed.
Troubleshooting Common Issues
Even with careful installation, problems can pop up. Here’s how to fix the most common ones.
Cover Keeps Slipping
If your cover slides down or shifts while driving, the straps may not be tight enough. Reattach them and pull firmly. If the issue persists, consider using non-slip seat cover pads or adhesive Velcro strips for extra grip.
Wrinkles Won’t Smooth Out
Persistent wrinkles often mean the cover is too small or the wrong size. Double-check that you’re using the correct model for your car. If it’s the right size, try reinstalling from scratch—sometimes a second attempt yields better results.
Straps Won’t Stay Attached
If hooks or clips keep coming loose, inspect them for damage. Replace broken parts or use zip ties as a temporary fix. Some drivers also use safety pins (carefully!) to reinforce weak spots.
Cover Looks Baggy
A loose fit usually means the cover isn’t designed for your specific seat shape. Universal covers often have this issue. Consider upgrading to a custom-fit model for a cleaner, more professional appearance.
Tips for Long-Term Care
Now that your seat covers are back in place, keep them looking great with regular maintenance.
Wash Regularly
Aim to wash your seat covers every 1–2 months, or more often if you have kids, pets, or drive frequently. Follow the manufacturer’s care instructions to avoid shrinkage or fading.
Spot Clean Between Washes
For small spills or stains, use a damp cloth with mild soap. Blot—don’t rub—to avoid spreading the stain.
Store Properly When Not in Use
If you remove the covers for deep cleaning or seasonal changes, store them in a cool, dry place. Fold them neatly and avoid plastic bags, which can trap moisture.
Conclusion
Putting your car seat cover back on after washing doesn’t have to be a chore. By following these simple steps—drying thoroughly, starting with the headrest, securing straps, and smoothing out wrinkles—you can reinstall your covers quickly and easily. Not only will your car look cleaner, but you’ll also protect your original seats from wear and tear.
Remember, a little care goes a long way. With regular cleaning and proper installation, your seat covers will stay fresh, functional, and stylish for years to come. So next time you pull out the washing machine, don’t dread the reinstall—embrace it as part of keeping your car in top shape.
Now go enjoy that clean, comfortable ride!