How to Clean Foggy Headlights at Home (Methods That Actually Last)

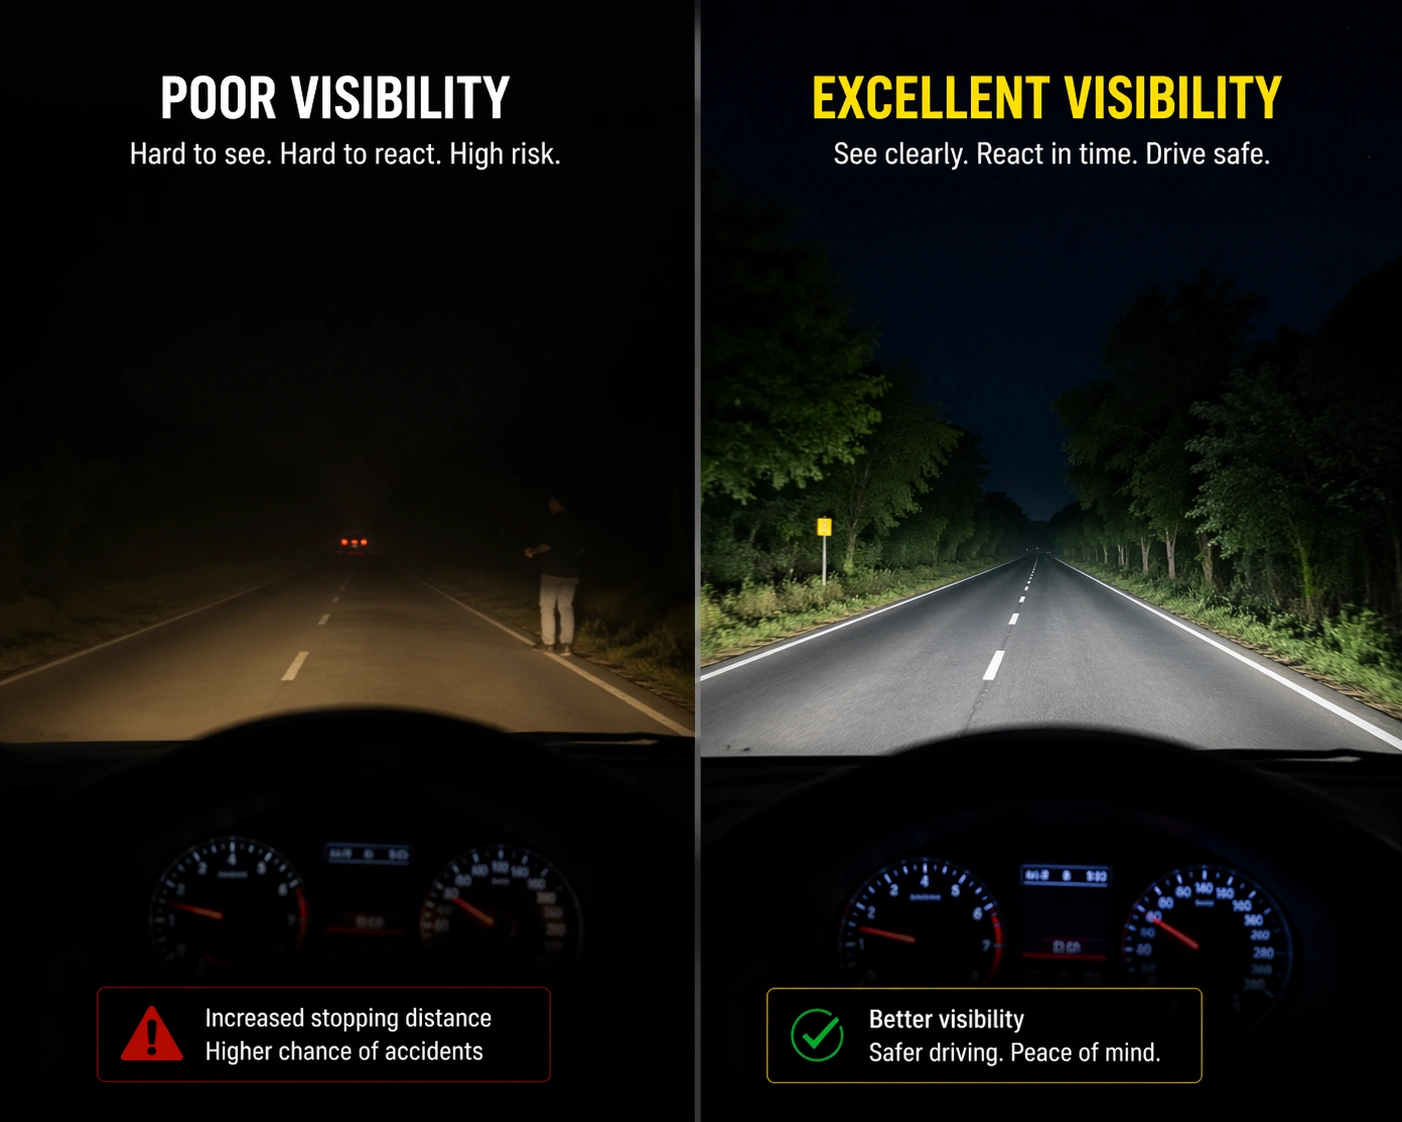
This is what foggy headlights actually do to your night vision — and how different it looks after restoration.
Your headlights look like someone smeared Vaseline over them — and honestly, that’s not far off from what’s happening. The good news? You can fix it today, at home, for almost nothing.
I’ve been working on cars for over 15 years. One thing I see constantly — even on newer vehicles — is yellowed, hazy headlights that make the car look old and worn out. Worse, foggy headlights can reduce your night visibility by up to 80%. That’s not a small deal. It’s a real safety risk.
I’ve personally tried nearly every method out there — toothpaste, baking soda, WD-40, and proper restoration kits. I’ll walk you through everything I know so you can get crystal-clear headlights without spending a lot of money or time.
To clean foggy headlights at home, you can use toothpaste and a microfiber cloth for a quick fix — but for a lasting result, a headlight restoration kit is the way to go. It sands away the oxidation, polishes the lens, and seals it so the cloudiness doesn’t come back for years. Most kits take 30–45 minutes and cost under $30.
Why Do Headlights Get Foggy in the First Place?
Most modern headlights are made from polycarbonate plastic — not glass. The factory applies a UV-protective coating on top. Over time, sun exposure breaks down that coating, and the plastic underneath oxidizes. That’s exactly what creates the cloudy, yellow look.
Here’s what’s actually happening:
- UV rays degrade the factory UV-protective coating — the #1 cause
- Road chemicals — salt, tar, and cleaning solvents eat through what’s left
- Heat from the bulb inside bakes the plastic over years of use
- Parking outdoors means constant UV exposure with no relief
It’s not dirt. It’s oxidation — and no amount of car washing will fix it. You need to actually remove that damaged surface layer. That’s what restoration does.
Foggy headlights aren’t just an eyesore. They’re a genuine road hazard.
- Severely oxidized headlights reduce light output by up to 80%, per AAA testing
- Reduced visibility is a leading factor in nighttime pedestrian accidents
- In many states, degraded headlights can result in a failed vehicle inspection
- Standard halogen bulbs already underperform — oxidized lenses make it far worse
Fix this now, not later. It’s a 20-minute job that makes a real safety difference.
This is the exact kit I used on my 2009 Tacoma and my wife’s SUV. It went from milky yellow to nearly showroom-clear in about 40 minutes. Everything comes in the box — sanding discs, polish, and the UV sealant that actually makes results last. The difference before and after was genuinely shocking.
- Clears oxidation, yellowing, and haze in one session
- Includes multiple grits + polishing compound + UV sealant
- Works on all polycarbonate headlight lenses
- No machine needed — hand application works fine
- UV coat protects against re-oxidation for 2–3 years
*As an Amazon Associate I earn from qualifying purchases. Price and availability may vary.
How to Clean Foggy Headlights Without a Kit (Free Method)
Don’t have a kit on hand? Here’s what you can do right now with things you probably already own. This works best for mild cloudiness or light haze.
What You’ll Need
- White toothpaste — regular paste, not gel
- 2–3 microfiber cloths
- Dish soap and warm water
- Masking tape or painter’s tape
- UV spray sealant (optional but highly recommended)
-
Wash the headlight thoroughly Use dish soap and warm water to remove surface dirt and bugs. Dry completely with a clean microfiber cloth before touching the lens.
-
Tape off the surrounding paint Run masking tape around the edges of the headlight housing. This protects your paint from accidental scratching. Takes 2 minutes — skip it at your own risk.
-
Apply toothpaste in firm circular motions Squeeze a dime-sized amount onto a damp cloth and rub in circles with firm pressure. Cover the entire lens. The mild abrasive texture removes the oxidized surface layer.
-
Rinse off and repeat if needed Rinse with clean water. For mild hazing, one round may be enough. For more visible yellowing, do two or three passes — you’ll see the cloth picking up yellow residue. That’s the oxidation coming off.
-
Dry and inspect in natural light Wipe dry and check results. A mild haze should be noticeably better. Deep oxidation will still need a proper kit — toothpaste can’t sand through heavy yellowing.
-
Apply a UV protectant (strongly recommended) Without UV protection, oxidation returns fast — often within weeks. A spray-on UV sealant turns weeks of results into months.
Work in the shade, not direct sunlight. Heat makes the paste dry too fast and leaves streaks on the lens. Also — whitening toothpaste works slightly better because it has more abrasive content than regular paste.
The honest truth? The toothpaste method works great for light hazing and lasts a few weeks. But if your lenses are noticeably yellow or feel rough to the touch, you need a proper kit. The difference in clarity and longevity is dramatic.
Why a Restoration Kit Works Better Than Toothpaste
I tried the toothpaste method for years before I finally grabbed a proper kit. I wished I’d done it sooner. Here’s the honest side-by-side:
| Factor | Toothpaste / DIY | Restoration Kit |
|---|---|---|
| Cost | Free (or <$3) | $15–$30 |
| Heavy oxidation | ✗ Struggles | ✓ Handles it easily |
| UV sealant included | ✗ No | ✓ Yes |
| Results last 1+ year | ✗ Weeks at best | ✓ Often 2–3 years |
| Time to complete | 15–20 min | 30–45 min |
| Deeply yellowed lenses | ✗ Minimal impact | ✓ Dramatic improvement |
The kit uses a multi-stage sanding process that removes the oxidized plastic layer — not just buffs the surface. Then the UV coating replaces the factory protection that wore off. That’s what separates a real fix from a temporary patch.
If your headlights are deeply yellowed or you can see visible scratching in the lens, this is the route I’d go. The multi-grit sanding process strips away all the oxidized plastic properly. Then the compound polishes it smooth. Then the UV coat locks in the results. Done right the first time.
- Multi-stage sanding removes deep oxidation properly
- Professional-level clarity even on heavily degraded lenses
- UV protective topcoat holds results for 2–3 years
- Thousands of verified 5-star reviews from real drivers
- Works on headlights, tail lights, and turn signal covers
*As an Amazon Associate I earn from qualifying purchases. Price and availability may vary.
How Long Do Results Last?
This depends almost entirely on whether you apply a UV sealant at the end. Here’s the real-world breakdown:
- Toothpaste only: 4–8 weeks before haze returns
- Kit without UV coat: 3–6 months
- Kit with UV sealant applied correctly: 2–3 years, sometimes longer
After restoring, try to park in a garage or shaded spot when you can. It won’t make or break the results — but it does slow UV degradation down meaningfully.
Apply a thin layer of automotive paste wax right over the dried UV sealant for extra protection. It adds months to your results. I do this every single time — takes 5 extra minutes and it’s worth it.
How to Keep Your Headlights Clear After Restoring
- Park in a garage or shade whenever you can — UV exposure is the #1 cause of re-oxidation
- Wax your headlights when you wax your car — it adds a thin UV barrier for free
- Reapply UV sealant every 12–18 months as maintenance
- Use a car cover if you park outside regularly and want maximum protection
- Avoid cheap plastic cleaners — some actually strip UV protection faster than doing nothing
Don’t skip the masking tape. I know it feels like an unnecessary step, but sanding compound on car paint leaves micro-scratches that are a pain to deal with later. Take 3 minutes to tape properly — you’ll thank yourself.
Frequently Asked Questions
Yes — but only for mild haze, and the results are temporary. Toothpaste contains mild abrasives that remove the outermost layer of oxidation. It’ll improve clarity noticeably. But without a UV sealant applied after, the sun breaks the plastic back down within weeks. For any significant yellowing, a restoration kit is a much better investment.
A proper restoration using a sanding kit with UV sealant typically lasts 2–3 years. The toothpaste method lasts weeks to a few months at most. Parking in a garage and reapplying UV protectant every year will stretch your results considerably further.
WD-40 can temporarily make headlights look clearer — it fills micro-scratches and adds a thin oily film. But it doesn’t remove oxidation, and the effect fades within days. It’s more of a quick visual trick than an actual fix. I wouldn’t bother with it when a proper method takes only 30 minutes.
Restoration is almost always worth trying first. Replacing a single headlight assembly can cost $150–$600+, while a restoration kit runs under $30. If the lens is cracked or deeply pitted beyond repair, replacement makes sense — but for typical oxidation, a kit will get you 80–95% of the way back to clear for a fraction of the cost.
If the haziness is coming from inside the headlight housing — moisture, mold, or a failed seal — no amount of sanding the outside will fix it. You’ll need a replacement. But if the fogginess is on the outer surface (which it usually is), restoration will work. Run your fingernail across the lens — if you feel roughness or scratch up yellow residue, that’s oxidation you can sand away.
It depends on your state and how severe the haze is. In many states, inspectors check that headlights meet minimum light output requirements. Heavily oxidized lenses that significantly reduce light output can lead to a failed inspection. Even if yours pass technically, fixing them is the right call for your safety and everyone else on the road.
Final Thoughts
Foggy headlights are one of those problems that sneak up on you. You don’t notice how bad they’ve gotten until you’re driving at night wondering why you can barely see. I’ve been there — and I’ve done this on three of my own vehicles. Every single time, I wished I’d done it sooner.
The toothpaste trick is fine for a quick refresh. But if you want real results that actually last, a restoration kit is the honest answer. It’s a one-time purchase that fixes the problem properly — and the UV sealant step is what separates a real fix from a temporary patch.
Most people who do this for the first time are genuinely shocked at the difference. Clear headlights change how your car looks and how safe it is to drive at night. It’s worth 30 minutes of your weekend.
*As an Amazon Associate I earn from qualifying purchases. This doesn’t affect your price.
